Newbee's 52 Mainline Ute
-
36Phaeton
- Posts: 46
- Joined: Fri Jun 24, 2016 6:31 pm
- Location: Southern Tasmania
Re: Newbee's 52 Mainline Ute
The van is going to look mint behind the mainline and an excellent excuse for more power
I’m bilingual, I speak both imperial and metric.
36 Ford Tourer
31 Ford Vicky
36 Ford Tourer
31 Ford Vicky
-
Newbee

- Member
- Posts: 578
- Joined: Mon May 26, 2014 10:59 pm
- Location: YP of SA
Re: Newbee's 52 Mainline Ute
Well its been a while, as usual time flies, I've been finishing some projects on the van and you all know how that goes, one thing leads to another.
I started with fixing the tail lights, none of which worked, a bit strange 4 out of 4 globes blown ? Turns out the Chrysler Royal lights had been put on
there but with no wiring to either L or R tail light but centre number plate and side clearance lights all worked, so I had to partially pull of one side
of the rear side panel to find the feed to the clearance light, ran wires through the corner of the wood frame, tidied up the dodgy wires that were
twitched together, put 4 pin connector plugs on each so the light assemblies could be removed for maintenance. Made new mounting brackets for each
set of 3 lights out of some diamond pattern aluminum the same as the back panel of the van, mounted them with nutcerts so they can be easily removed.
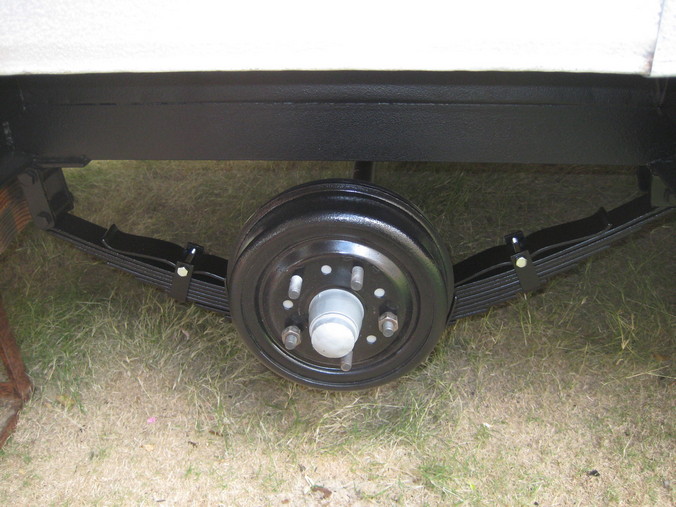
Next of course was check wheel bearings, brakes and spring bushes. Bearings and brake shoes/drums were fine, wheel cylinders were rusted solid, but a
new set of rubbers and a hone fixed that. Spring shackle bushes were toast so a new set each side. Also replaced the 7/16" wheel studs with 1/2", it
was a Ford wheel pattern (luckily) but using the smaller Holden bearings.
Of course everything underneath the van was original paint and very crusty/rusty so I tidied up the axle and wheel arch areas, sent the wheels off for sand blasting,
put it all back together and took it down the road to have the chassis and frame work sand blasted. I undercoated and painted it all with a brush laying on my back
while it was up on car ramps.
Oh for a hoist, anyway I used some Wattyl Rust Guard with hardener courtesy of my son's leftovers, hopefully to lasts another 54 years. I did the wheel arch area
with the Raptor coating, came out good but it's pretty exe buying it in aerosol cans, took 1 each side, probably could have done with another 1/2 a can each side.
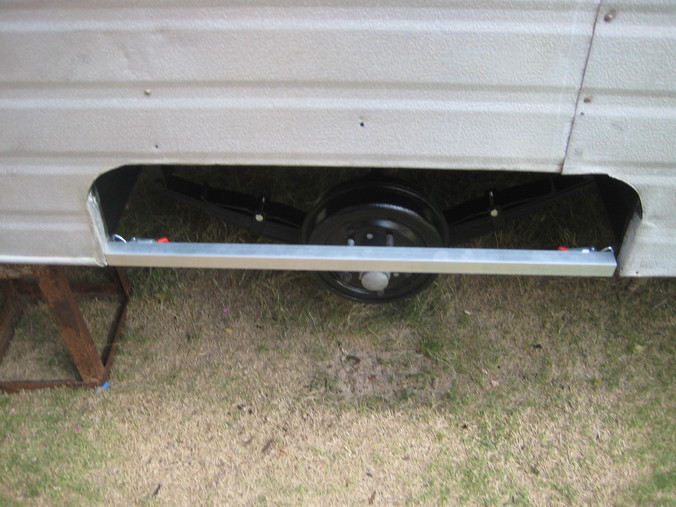
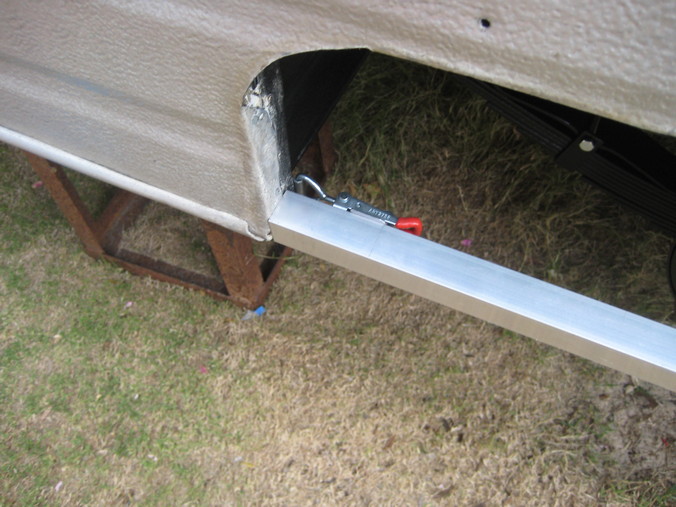
Next was to ditch the spats old mate had put on there, they were only held on with a few screws through thin aluminum, not easy to get off if you had a flat
and each had a piece of 4x2 at the back holding up the galv spat ?? So I got some 1.2 mm ali sheet, and 25 mm square tube to which I mounted over centre
catches for easy removal.
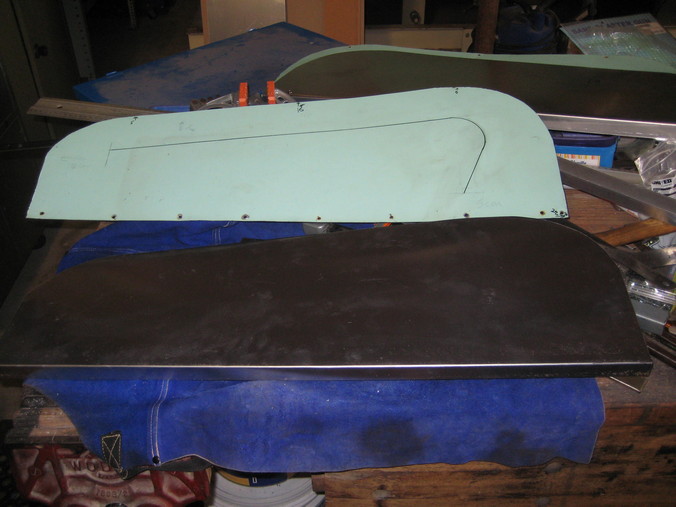
The shape of the green ones was OK so I copied them but decided a strengthening/decorative bead would look good, I copied the shape of the body line on the
Mainline rear quarter/mudguard area.
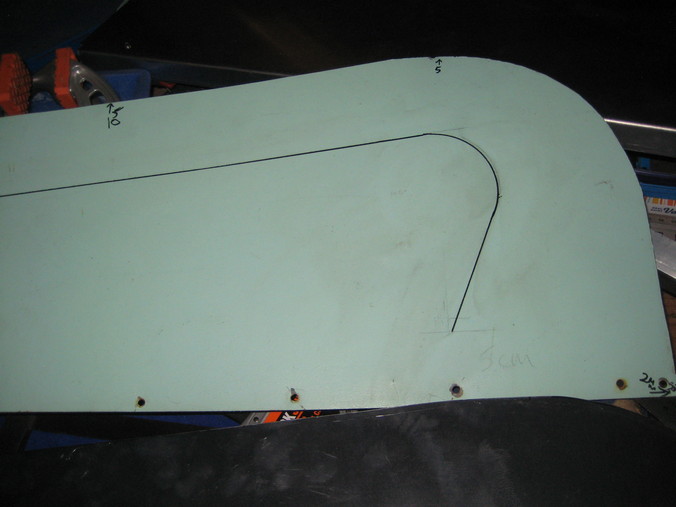
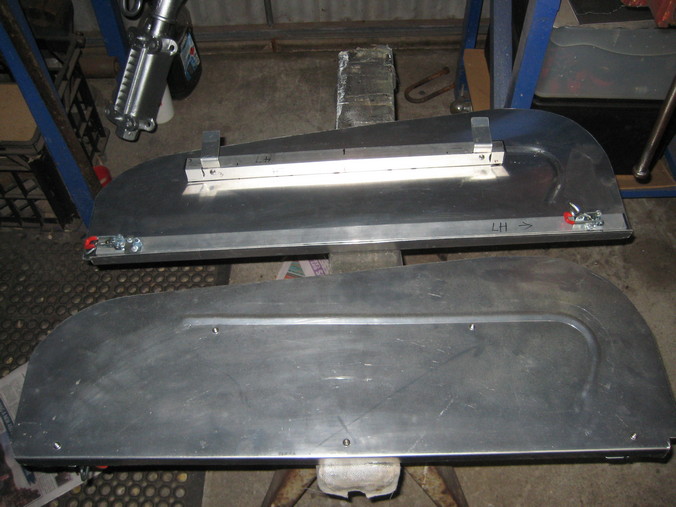
I changed the bead line from following the top angle of the spat to horizontal as it looked better and as was on the Mainline.
I also put a top bracket on them with 2 hooks to hold the top tight and allow removal without having to remove screws. I positioned the 25 mm tubes with
button head SS bolts with nutcerts into the tube. The top 2 hook brackets are also adjustable so they can be kept firm. After it was all test fitted I ran
SikaFlex adhesive beads between the spat and the 25 mm tube to give them additional rigidity.
A few more things this week end, run new wiring into the van for rear/clearance lights and also for the 12 V interior lighting/fridge and hook it to the
auxiliary battery I have installed inside the van cupboard.
A new spare tyre mounting and gas bottle holders, that will fill in the weekend I recon.
Regards Newbee
I started with fixing the tail lights, none of which worked, a bit strange 4 out of 4 globes blown ? Turns out the Chrysler Royal lights had been put on
there but with no wiring to either L or R tail light but centre number plate and side clearance lights all worked, so I had to partially pull of one side
of the rear side panel to find the feed to the clearance light, ran wires through the corner of the wood frame, tidied up the dodgy wires that were
twitched together, put 4 pin connector plugs on each so the light assemblies could be removed for maintenance. Made new mounting brackets for each
set of 3 lights out of some diamond pattern aluminum the same as the back panel of the van, mounted them with nutcerts so they can be easily removed.
Next of course was check wheel bearings, brakes and spring bushes. Bearings and brake shoes/drums were fine, wheel cylinders were rusted solid, but a
new set of rubbers and a hone fixed that. Spring shackle bushes were toast so a new set each side. Also replaced the 7/16" wheel studs with 1/2", it
was a Ford wheel pattern (luckily) but using the smaller Holden bearings.
Of course everything underneath the van was original paint and very crusty/rusty so I tidied up the axle and wheel arch areas, sent the wheels off for sand blasting,
put it all back together and took it down the road to have the chassis and frame work sand blasted. I undercoated and painted it all with a brush laying on my back
while it was up on car ramps.
Oh for a hoist, anyway I used some Wattyl Rust Guard with hardener courtesy of my son's leftovers, hopefully to lasts another 54 years. I did the wheel arch area
with the Raptor coating, came out good but it's pretty exe buying it in aerosol cans, took 1 each side, probably could have done with another 1/2 a can each side.
Next was to ditch the spats old mate had put on there, they were only held on with a few screws through thin aluminum, not easy to get off if you had a flat
and each had a piece of 4x2 at the back holding up the galv spat ?? So I got some 1.2 mm ali sheet, and 25 mm square tube to which I mounted over centre
catches for easy removal.
The shape of the green ones was OK so I copied them but decided a strengthening/decorative bead would look good, I copied the shape of the body line on the
Mainline rear quarter/mudguard area.
I changed the bead line from following the top angle of the spat to horizontal as it looked better and as was on the Mainline.
I also put a top bracket on them with 2 hooks to hold the top tight and allow removal without having to remove screws. I positioned the 25 mm tubes with
button head SS bolts with nutcerts into the tube. The top 2 hook brackets are also adjustable so they can be kept firm. After it was all test fitted I ran
SikaFlex adhesive beads between the spat and the 25 mm tube to give them additional rigidity.
A few more things this week end, run new wiring into the van for rear/clearance lights and also for the 12 V interior lighting/fridge and hook it to the
auxiliary battery I have installed inside the van cupboard.
A new spare tyre mounting and gas bottle holders, that will fill in the weekend I recon.
Regards Newbee
-
Jeff Hitchins

- Posts: 493
- Joined: Wed Feb 02, 2005 3:24 pm
- Location: Perth WA
Re: Newbee's 52 Mainline Ute
Good job on the spats and underneath the van. Looks very clean and certainly well worth the effort.
-
Gojeep
- Old Hand
- Posts: 7224
- Joined: Mon Jan 07, 2008 1:24 pm
- Location: Eastern Suburbs of Melbourne
- Contact:
Re: Newbee's 52 Mainline Ute
Good to see you and looking after the old van to live on for the next generation. 
Marcus
To try where there is little hope, is to risk failure.
Not to try at all, is to guarantee it!
____| \______\
|/¯\ |¯ |----O||||O
()_)-o-)¯¯()_)-o-)_)
To try where there is little hope, is to risk failure.
Not to try at all, is to guarantee it!
____| \______\
|/¯\ |¯ |----O||||O
()_)-o-)¯¯()_)-o-)_)
-
Angry
- Member
- Posts: 571
- Joined: Wed Nov 27, 2013 10:55 pm
- Location: Wagga Wagga Riverina NSW
Re: Newbee's 52 Mainline Ute
the Van looks awsome.....
I bought a small 1985 Viscount poptop myself its pretty tidy n tows behind Effy easy........If the loose nut behind the wheel can keep his foot off the gas pedal.....LOL
Its not huge but its like the tardis heaps of room inside , shes a 17footer...
I bought a small 1985 Viscount poptop myself its pretty tidy n tows behind Effy easy........If the loose nut behind the wheel can keep his foot off the gas pedal.....LOL
Its not huge but its like the tardis heaps of room inside , shes a 17footer...
Al.
64 Ford F100 SWB Patina Pickup
69 Camaro Z28 Clone....
64 Ford F100 SWB Patina Pickup
69 Camaro Z28 Clone....
-
jailbar joe
- Old Hand
- Posts: 3440
- Joined: Sat Oct 24, 2009 8:33 pm
- Location: york west aus
Re: Newbee's 52 Mainline Ute
van is looking good ian....nice touch with the spats......go the old vans
cheers joe
if you do nothing then nothing happens
if you do nothing then nothing happens
-
Newbee
- Member
- Posts: 578
- Joined: Mon May 26, 2014 10:59 pm
- Location: YP of SA
Re: Newbee's 52 Mainline Ute
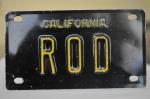
Its been a while since I've posted progress on the Mainline, a bit slack I know but it's all go now on the Forum thanks to Rod,
so time for more content. (I have to re-learn how to post photos)
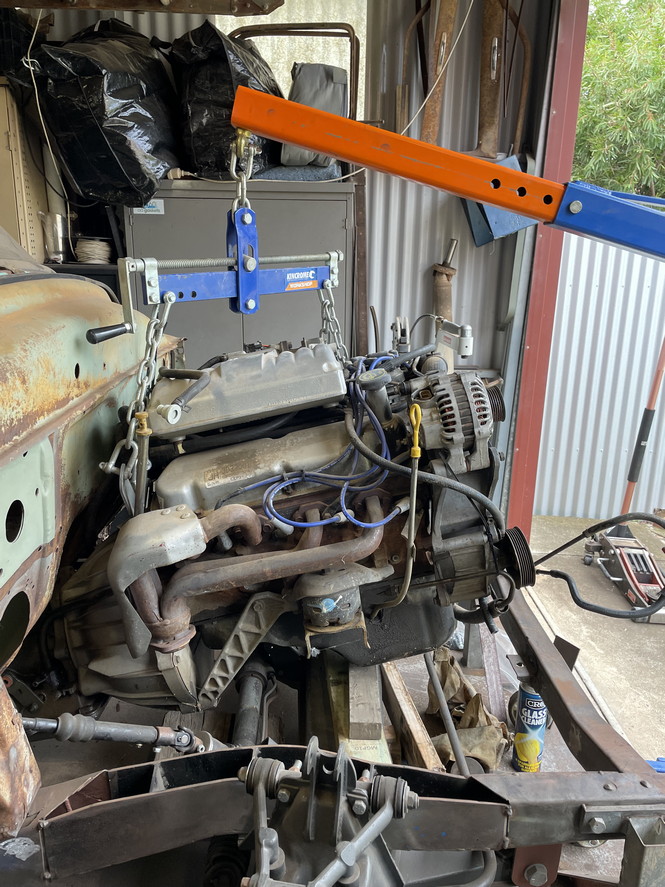
I finally got the engine and trans out of my other garage and into the Mainline, I borrowed a mates forklift and of course it
got bogged in my lawn about 3 m from the shed apron.
Before the front sump was removed.
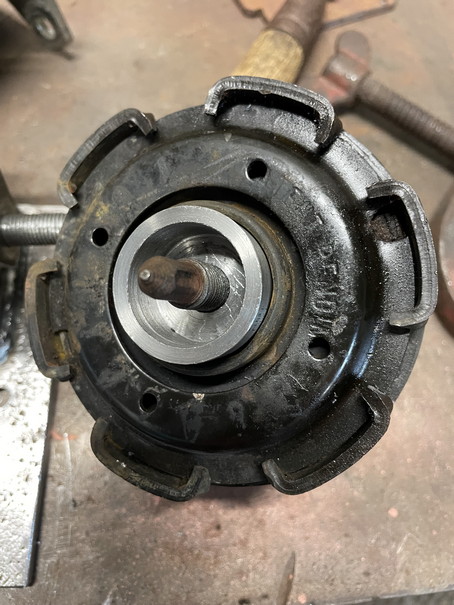
Used new factory hydraulic mounts that were original to the engine, the others were bent by the wreckers when the engine
was removed from the Fairlane. I machined up the tube for the bolt out of 3/4" shaft and made 6 mm plates to go on the factory Jag mounts.
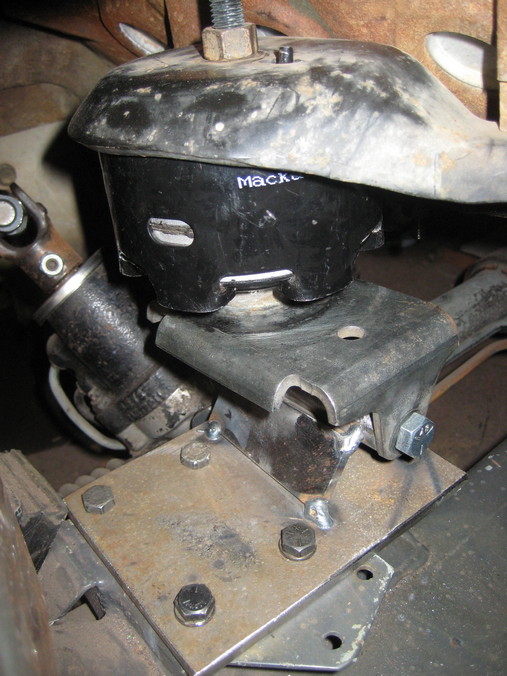
Made up the rear trans mount, this sits on the X member and will be bolted through the bottom 10 mm flange of the X member.
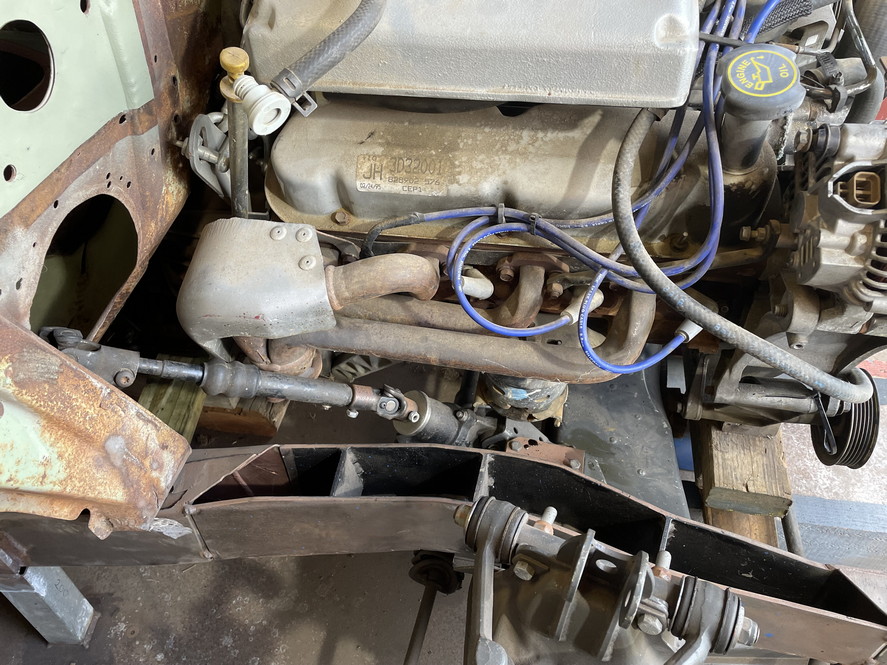
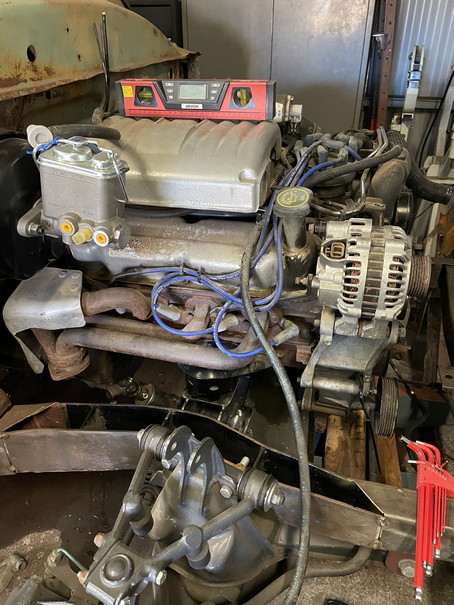
Sitting pretty good with enough clearance on the trans tunnel, the steering shaft will be close so a little more heat shielding may be needed.
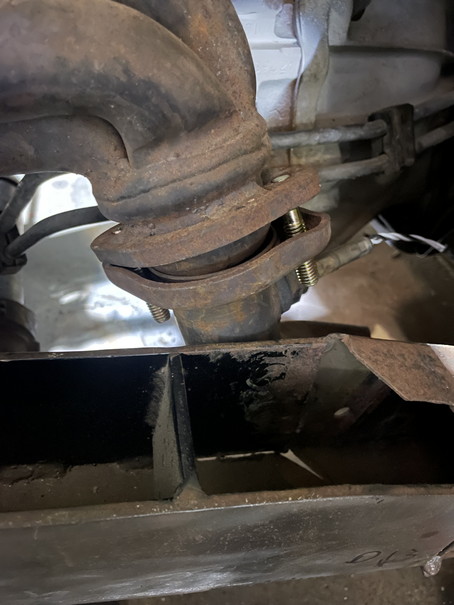
The LHS exhaust flange may need a little massaging to clear the chassis.
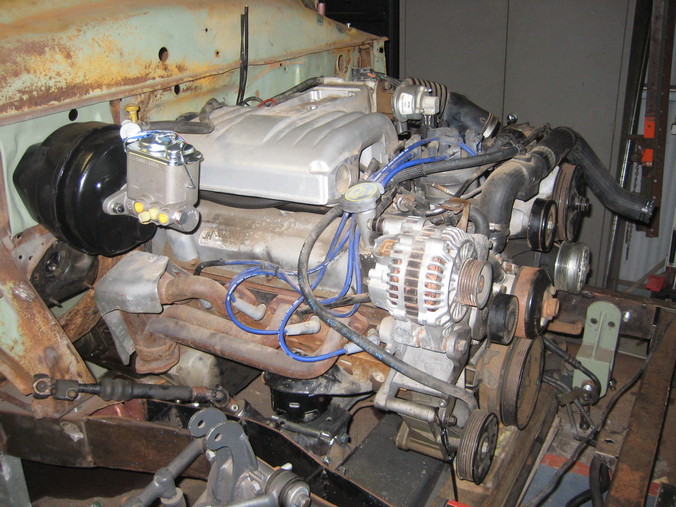
Once the mounts are sorted it will be onto cut and shut the truck rear sump to fit around the steering rack etc.
I have about 2 degrees of down angle on the engine, is this about right ?
More to come, Regards Newbee.
so time for more content. (I have to re-learn how to post photos)
I finally got the engine and trans out of my other garage and into the Mainline, I borrowed a mates forklift and of course it
got bogged in my lawn about 3 m from the shed apron.
Before the front sump was removed.
Used new factory hydraulic mounts that were original to the engine, the others were bent by the wreckers when the engine
was removed from the Fairlane. I machined up the tube for the bolt out of 3/4" shaft and made 6 mm plates to go on the factory Jag mounts.
Made up the rear trans mount, this sits on the X member and will be bolted through the bottom 10 mm flange of the X member.
Sitting pretty good with enough clearance on the trans tunnel, the steering shaft will be close so a little more heat shielding may be needed.
The LHS exhaust flange may need a little massaging to clear the chassis.
Once the mounts are sorted it will be onto cut and shut the truck rear sump to fit around the steering rack etc.
I have about 2 degrees of down angle on the engine, is this about right ?
More to come, Regards Newbee.
-
zuffen
- Senior Member
- Posts: 1934
- Joined: Fri Jan 28, 2011 7:45 pm
- Location: Sydney
Re: Newbee's 52 Mainline Ute
As long as the down angle matched the up angle on the diff flange, all good. Bear in mind the angles change all the time with suspension travel so being within a degree is pretty damned good.
Does anyone do engine swaps where there is more room after the swap than before? We always have jam packed engine bays.
Looking good. You also mastered the photos.
Does anyone do engine swaps where there is more room after the swap than before? We always have jam packed engine bays.
Looking good. You also mastered the photos.
Never argue with an idiot, they will drag you down to their level and beat you with experience.
-
Gojeep
- Old Hand
- Posts: 7224
- Joined: Mon Jan 07, 2008 1:24 pm
- Location: Eastern Suburbs of Melbourne
- Contact:
Re: Newbee's 52 Mainline Ute
Great to see progress again.
Typically 3 degrees down is the norm, but as Rod said, it needs to match how much the pinion angle is up.
Typically 3 degrees down is the norm, but as Rod said, it needs to match how much the pinion angle is up.
Marcus
To try where there is little hope, is to risk failure.
Not to try at all, is to guarantee it!
____| \______\
|/¯\ |¯ |----O||||O
()_)-o-)¯¯()_)-o-)_)
To try where there is little hope, is to risk failure.
Not to try at all, is to guarantee it!
____| \______\
|/¯\ |¯ |----O||||O
()_)-o-)¯¯()_)-o-)_)
-
Sly Fox
- Senior Member
- Posts: 1925
- Joined: Sat Apr 24, 2010 7:10 pm
- Location: Castle Hill, NSW
Re: Newbee's 52 Mainline Ute
Welcome back Newbee, good to see the motor going in.
Keep the updates coming.
Keep the updates coming.
51 Dodge Custom & 63 EH Ute - Dare to be different
-
FRANK BASILE

- Old Hand
- Posts: 13898
- Joined: Wed May 07, 2003 3:14 pm
Re: Newbee's 52 Mainline Ute
Nice work. Those Mazda Bravo/Ford Courier splined steering couplings were designed to be Jag friendly 
OZ-E-Rodders Rod and Kustom Club Member #31
-
Newbee
- Member
- Posts: 578
- Joined: Mon May 26, 2014 10:59 pm
- Location: YP of SA
Re: Newbee's 52 Mainline Ute
Thanks for the previous advice re the steering shaft Frank, the hardest problem was finding a universal joint
with 36 (Ford) to 48 spline (Jag rack).
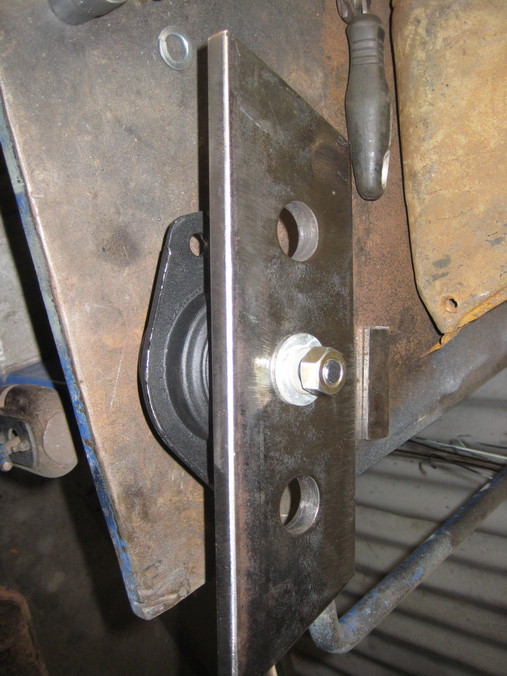
I let the motor down onto the mounts but it flopped over to one side so back to the drawing board.
Regards Newbee
with 36 (Ford) to 48 spline (Jag rack).
I let the motor down onto the mounts but it flopped over to one side so back to the drawing board.

Regards Newbee
-
Newbee
- Member
- Posts: 578
- Joined: Mon May 26, 2014 10:59 pm
- Location: YP of SA
Re: Newbee's 52 Mainline Ute
I've not been slacking in the shed but a little on posting so time for some updates.
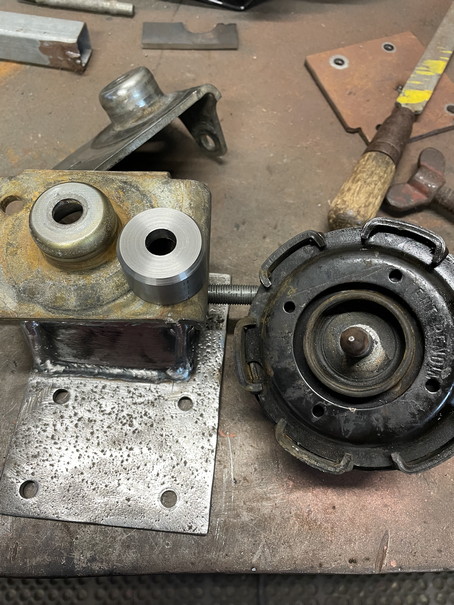
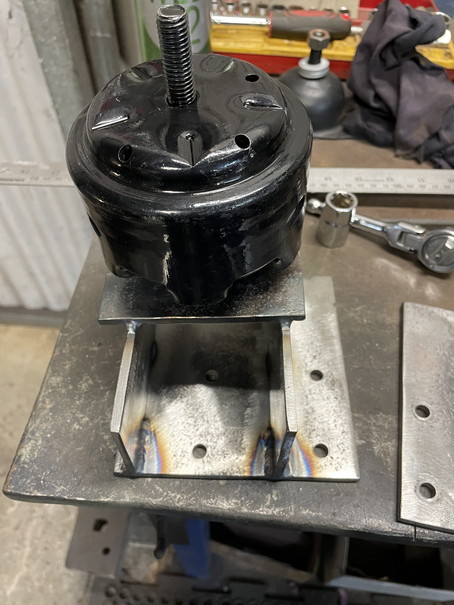
Engine Mounts, after the first fail back to the drawing board, I machined up the round "saddles" that go in the bottom of the mounting
then welded them to a flat plate, these work better with the hydraulic mounts now horizontal.
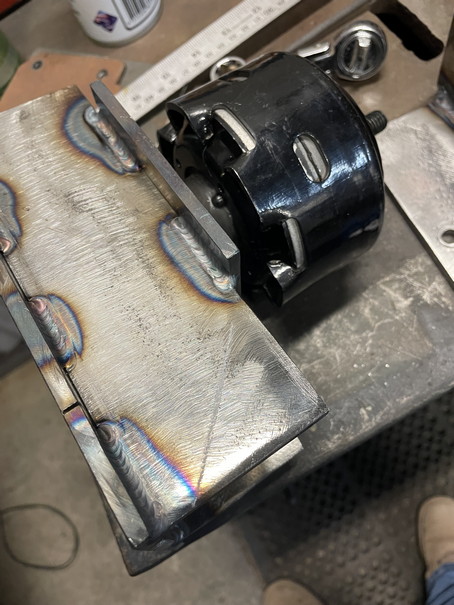
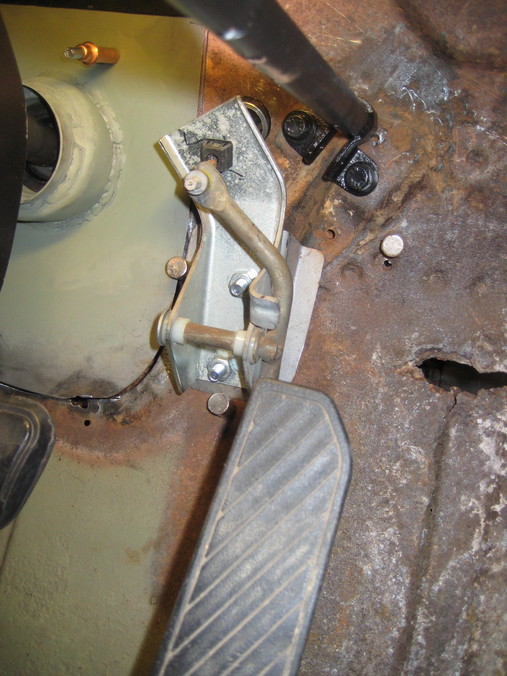
Left hand side exhaust flange is a little too close to the chassis so I'll have to straighten the angle a little.
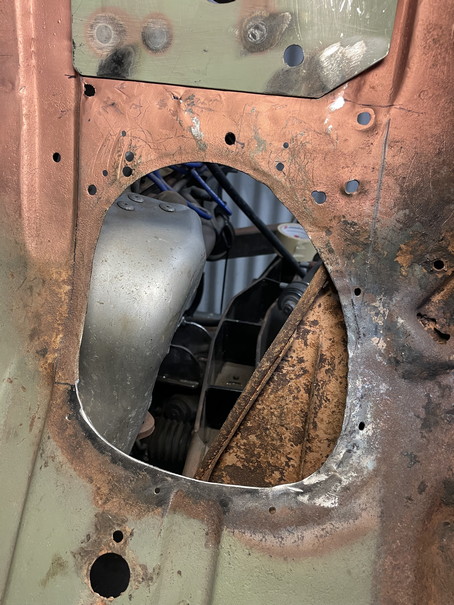
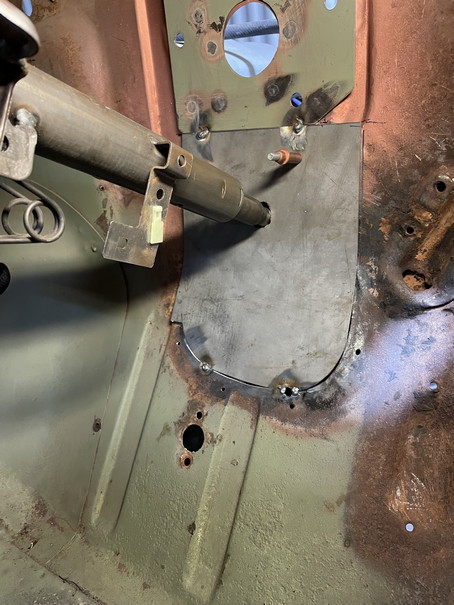
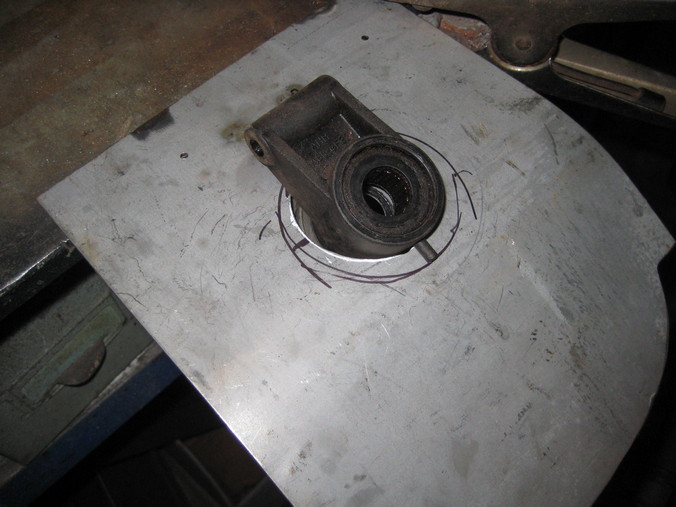
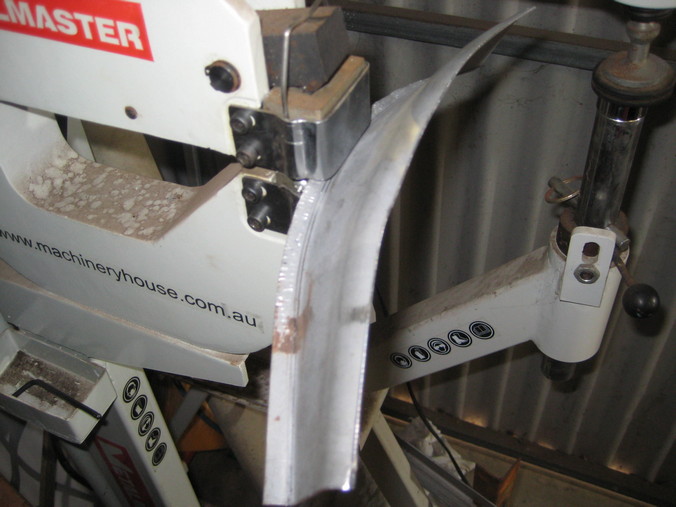
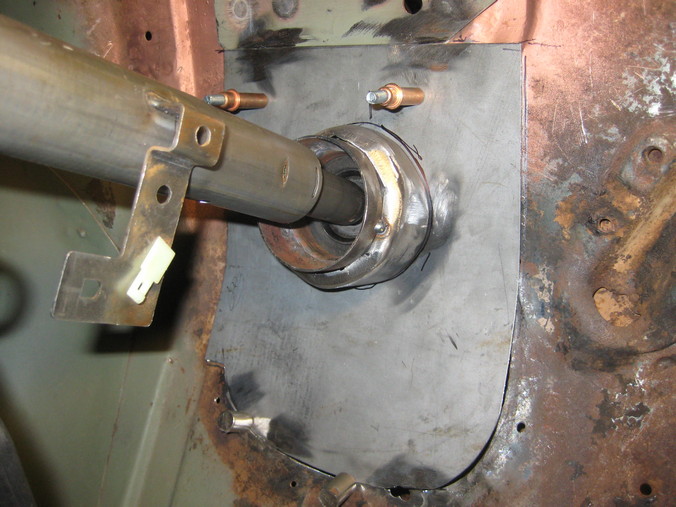
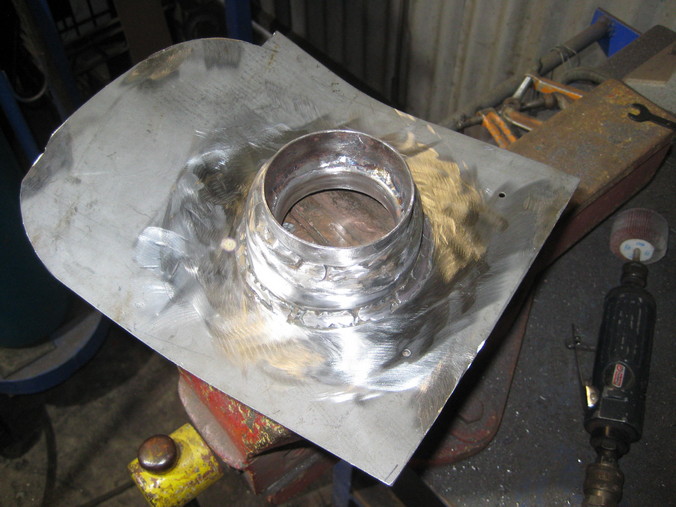
I had to fill in the hole in the toe board and make a bottom mounting for the adjustable steering column bearing, the column is from a EF Falcon.
It took a bit of wrangling to get the clearance right with the exhaust.

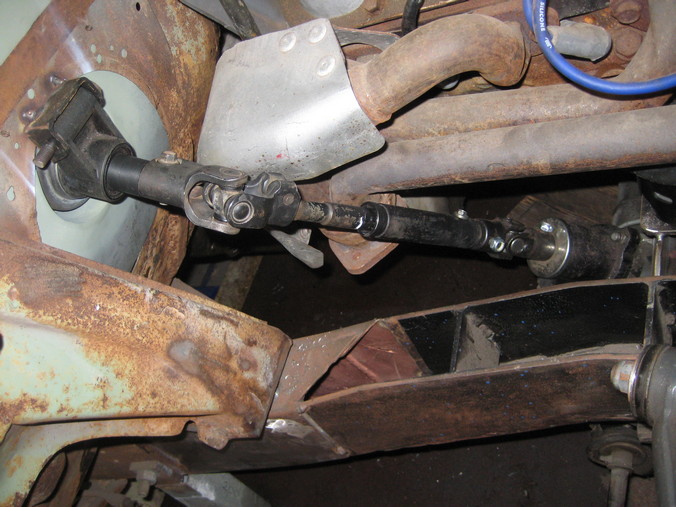
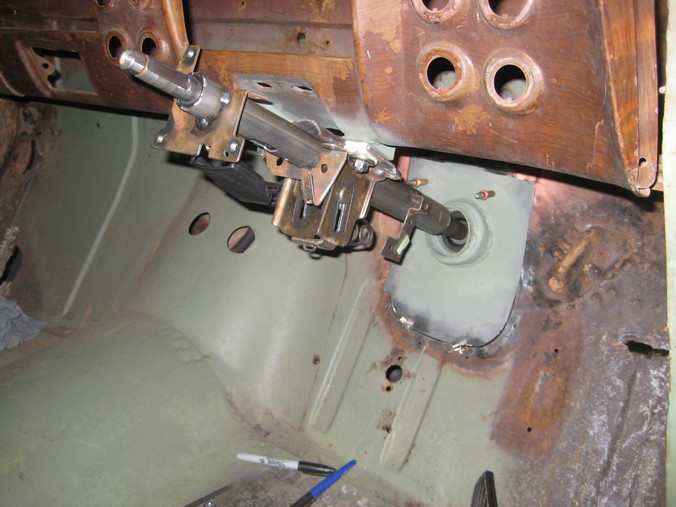
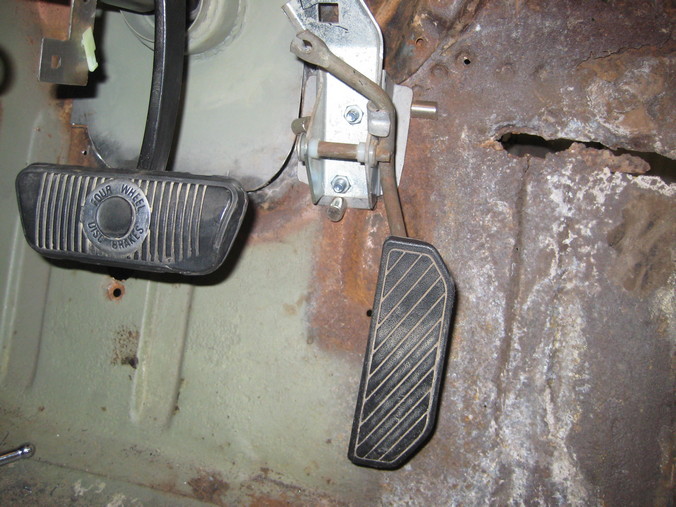
I'm using the accelerator pedal from the Fairlane so made up a bracket to mount it, close to the hand brake cable so I may make it removable.
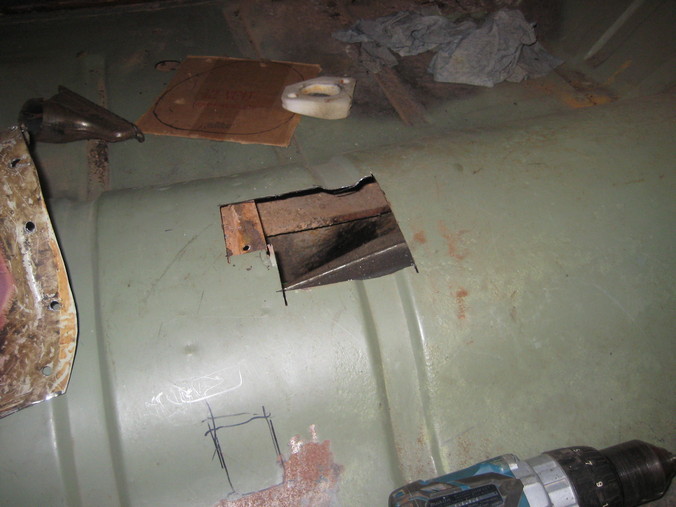
I cut a hole in the firewall for the cable which also goes through the firewall support bracket.
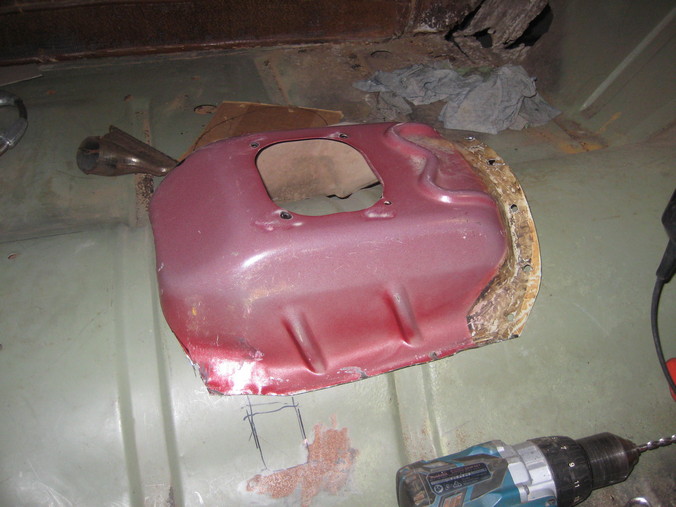
This is the hump from the Fairlane Trans but I think I'll make something more compact and extend it forward as part of the center console.
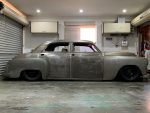
I've been doing these jobs to get things ready to remove the body but that will have to wait until after a trip to the US, back to Montana
where I lived and worked on a Ranch for a year in 1985 but also going to a few other places in Canada and the US.
Regards Newbee
Engine Mounts, after the first fail back to the drawing board, I machined up the round "saddles" that go in the bottom of the mounting
then welded them to a flat plate, these work better with the hydraulic mounts now horizontal.
Left hand side exhaust flange is a little too close to the chassis so I'll have to straighten the angle a little.
I had to fill in the hole in the toe board and make a bottom mounting for the adjustable steering column bearing, the column is from a EF Falcon.
It took a bit of wrangling to get the clearance right with the exhaust.
I'm using the accelerator pedal from the Fairlane so made up a bracket to mount it, close to the hand brake cable so I may make it removable.
I cut a hole in the firewall for the cable which also goes through the firewall support bracket.
This is the hump from the Fairlane Trans but I think I'll make something more compact and extend it forward as part of the center console.
I've been doing these jobs to get things ready to remove the body but that will have to wait until after a trip to the US, back to Montana
where I lived and worked on a Ranch for a year in 1985 but also going to a few other places in Canada and the US.
Regards Newbee
-
Gojeep
- Old Hand
- Posts: 7224
- Joined: Mon Jan 07, 2008 1:24 pm
- Location: Eastern Suburbs of Melbourne
- Contact:
Re: Newbee's 52 Mainline Ute
Great to see you are progressing and some nice TIG welds too.
Have a great trip back to the US.
Have a great trip back to the US.
Marcus
To try where there is little hope, is to risk failure.
Not to try at all, is to guarantee it!
____| \______\
|/¯\ |¯ |----O||||O
()_)-o-)¯¯()_)-o-)_)
To try where there is little hope, is to risk failure.
Not to try at all, is to guarantee it!
____| \______\
|/¯\ |¯ |----O||||O
()_)-o-)¯¯()_)-o-)_)
-
zuffen
- Senior Member
- Posts: 1934
- Joined: Fri Jan 28, 2011 7:45 pm
- Location: Sydney
Re: Newbee's 52 Mainline Ute
No shortage of peno on the welds.
All progress is a good thing.
Nice time of year in the States.
Not such a fan of Canada.
All progress is a good thing.
Nice time of year in the States.
Not such a fan of Canada.
Never argue with an idiot, they will drag you down to their level and beat you with experience.