Great thread Peter,
Following with interest.
Cheers
Ed
Model A Tourer Build
-
Ed
- Member
- Posts: 507
- Joined: Fri May 05, 2006 12:41 pm
- Location: Malabar
Re: Model A Tourer Build
Yes... it will be a car
-
Grazza

- Old Hand
- Posts: 4117
- Joined: Mon Jan 10, 2005 8:54 pm
- Location: Paradise In The Wide Bay
Re: Model A Tourer Build
I know what you mean about those patch panels Peter. I have a box full of them under the bench that I got for the T. Worked out easier and better to make our own in the end. Must be a difference between American cars and Australian ones I guess 

We didn't have any of those flash tools you've got, just took a lot longer with hammer and dolly is all.
We didn't have any of those flash tools you've got, just took a lot longer with hammer and dolly is all.
Graeme
I will forever defend your right
to disagree with my opinion.
"Within 5mm is Close Enough"
I will forever defend your right
to disagree with my opinion.
"Within 5mm is Close Enough"
-
T1916
- Senior Member
- Posts: 1180
- Joined: Thu Jun 21, 2012 8:25 am
- Location: Qld.
Re: Model A Tourer Build
Grazza
One of the guys in our night classes had a T coupe, came with patch panels from the states. The bottom door panels were about 4mm to wide and the side swage lines did not line up. The rear quarter patches did not match were it met the door. And the lower rear panel was too narrow and when fitted pulled the gaps tighter on the boot lid sides. So we remade them all.
Cheers GT
-
Grazza
- Old Hand
- Posts: 4117
- Joined: Mon Jan 10, 2005 8:54 pm
- Location: Paradise In The Wide Bay
Re: Model A Tourer Build
They sound like they could well have come from the same place mine did.
Graeme
I will forever defend your right
to disagree with my opinion.
"Within 5mm is Close Enough"
I will forever defend your right
to disagree with my opinion.
"Within 5mm is Close Enough"
-
toprodz

- Old Hand
- Posts: 2604
- Joined: Sun Mar 23, 2003 10:44 am
- Location: Wallan Victoria 0412 81 1932
Re: Model A Tourer Build
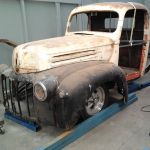
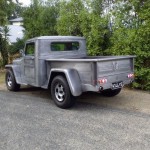
Well I thought I would start adding some stuff on my A tourer build, it all slowed down last year due to a couple of trips to NZ and hernia operation, so while sitting around after my recent knee replacement, I figured it was time to get back to building it, and to dedicate time to it every week, so to get it kicked off I have been doing a little as I recover, so that I can see when its ok to go back to work.
Well here we go I started off by welding up lots of cracks as well as adding a patch panel to the inside of one of the back doors, I did this one at home over a week trimming and welding in the home garage, while hobbling around on crutches,


Then I was able to drive again, so I headed down to the factory and started adding a frame to the original style floor frame to keep it flat and square along the full length of the body, then all the top hat sections and mounts were welded in place

Then the cowl section was reassembled so that I could start mounting it to the frame


Before I had surgery I had designed the front suspension crossmember and tack welded it together, Then it was dropped off to McDonald Brothers so Russel could design and make the upper and lower suspension arms, The phone call came that it was ready so I picked it up, and was more than happy with what I got. So it was back to the factory for a quick mock up into position, I will have to finish welding and sanding it before it gets welded in place permanently


I managed to get a set of HQ Holden stubs and drum brake hubs from a wrecker around the corner so I will have to start doing the calliper adaptors and modify the hubs to suit the VT commodore discs and callipers

Then it was time to replace some of the cowl front mountings as they were a little rusty and wouldn’t suit the upcoming recessed firewall


Then I dropped the tank off to the Blast Factory and got Nick to sandblast the inside and dash sections only, then it was etch primed along with the repaired cowl panels and all the to be welded sections were sprayed with copper weld through primer, all the bolt together sections were etch primed, they will be sealed with black urethane to provide a water prof joint,


The whole was bolted back together so that it will be square with an original fire wall for the final welding and fitting of the cowl panels.


Well that’s where it is up to for now, I have heaps to go and will just keep plugging away as time allows.
Thanks for looking in
Well here we go I started off by welding up lots of cracks as well as adding a patch panel to the inside of one of the back doors, I did this one at home over a week trimming and welding in the home garage, while hobbling around on crutches,
Then I was able to drive again, so I headed down to the factory and started adding a frame to the original style floor frame to keep it flat and square along the full length of the body, then all the top hat sections and mounts were welded in place
Then the cowl section was reassembled so that I could start mounting it to the frame
Before I had surgery I had designed the front suspension crossmember and tack welded it together, Then it was dropped off to McDonald Brothers so Russel could design and make the upper and lower suspension arms, The phone call came that it was ready so I picked it up, and was more than happy with what I got. So it was back to the factory for a quick mock up into position, I will have to finish welding and sanding it before it gets welded in place permanently
I managed to get a set of HQ Holden stubs and drum brake hubs from a wrecker around the corner so I will have to start doing the calliper adaptors and modify the hubs to suit the VT commodore discs and callipers
Then it was time to replace some of the cowl front mountings as they were a little rusty and wouldn’t suit the upcoming recessed firewall
Then I dropped the tank off to the Blast Factory and got Nick to sandblast the inside and dash sections only, then it was etch primed along with the repaired cowl panels and all the to be welded sections were sprayed with copper weld through primer, all the bolt together sections were etch primed, they will be sealed with black urethane to provide a water prof joint,
The whole was bolted back together so that it will be square with an original fire wall for the final welding and fitting of the cowl panels.
Well that’s where it is up to for now, I have heaps to go and will just keep plugging away as time allows.
Thanks for looking in
Regards
Peter Gough
FOUNDING MEMBER #24 OZ-E-RODDERS ROD & KUSTOM CLUB
Peter Gough
FOUNDING MEMBER #24 OZ-E-RODDERS ROD & KUSTOM CLUB
-
Gojeep
- Old Hand
- Posts: 7229
- Joined: Mon Jan 07, 2008 1:24 pm
- Location: Eastern Suburbs of Melbourne
- Contact:
Re: Model A Tourer Build
Great to see you back at it Peter. Hope your recovery goes as well as your progress on this. 
Marcus
To try where there is little hope, is to risk failure.
Not to try at all, is to guarantee it!
____| \______\
|/¯\ |¯ |----O||||O
()_)-o-)¯¯()_)-o-)_)
To try where there is little hope, is to risk failure.
Not to try at all, is to guarantee it!
____| \______\
|/¯\ |¯ |----O||||O
()_)-o-)¯¯()_)-o-)_)
-
Newbee

- Member
- Posts: 579
- Joined: Mon May 26, 2014 10:59 pm
- Location: YP of SA
Re: Model A Tourer Build
Looking good as usual, no point letting that little scratch on your knee slow you down. 
Regards Newbee
Regards Newbee
-
Chrisso
- Old Hand
- Posts: 4178
- Joined: Thu Apr 12, 2012 10:44 am
- Location: Albury NSW
Re: Model A Tourer Build
Great progress Pete, imagine how well it will go when you are a two legged man, thanks for the update very interesting as usual. 
-
HOT ROD FRED

- Old Hand
- Posts: 2521
- Joined: Thu Apr 06, 2006 8:23 am
- Location: Ringwood,Vic
Re: Model A Tourer Build
Always good to see an A Model project! I guess you're gonna get distracted with (customers) work now!? Are you going to do the fake patina bit on the outer patches, or actually paint it all now 
-
toprodz
- Old Hand
- Posts: 2604
- Joined: Sun Mar 23, 2003 10:44 am
- Location: Wallan Victoria 0412 81 1932
Re: Model A Tourer Build
Hi Fred I agree I love A Models, Yeah i do have to get back to a couple of customer builds, but will still be making some time for this build, so I am going to become an unpaying customerHOT ROD FRED wrote:Always good to see an A Model project! I guess you're gonna get distracted with (customers) work now!? Are you going to do the fake patina bit on the outer patches, or actually paint it all now
I am pretty much going to leave all the bare metal patchs as they are, so they will slowly gain some surface rust.
Regards
Peter Gough
FOUNDING MEMBER #24 OZ-E-RODDERS ROD & KUSTOM CLUB
Peter Gough
FOUNDING MEMBER #24 OZ-E-RODDERS ROD & KUSTOM CLUB
-
SimonG
- Posts: 499
- Joined: Wed Jan 20, 2016 3:56 pm
- Location: Cairns, Nth Queensland
Re: Model A Tourer Build
I like the idea of leaving the body natural Pete as I think they tell more of a story when you can see the scars.
-
Greg N Smith
- Senior Member
- Posts: 1070
- Joined: Thu Jan 05, 2006 1:47 am
- Location: Sunshine Coast QLD
Re: Model A Tourer Build
Hi SimonG
Are you talking about Pete TopRodz OR the Model A Tourer ?
I did intend to keep my legs original but both my legs have got many stories to tell ... Kombi Van vs motorbike ... Deer vs motorbike ... Truck vs leg etc ...
What's happening with upper coil-over mounts ? OR a transverse spring ???
I LIKE your work Pete !
Are you talking about Pete TopRodz OR the Model A Tourer ?
I did intend to keep my legs original but both my legs have got many stories to tell ... Kombi Van vs motorbike ... Deer vs motorbike ... Truck vs leg etc ...
McDonald Bros upper and lower arms look good and your crossmember has your signature welding "tags"SimonG wrote:I like the idea of leaving the body natural Pete as I think they tell more of a story when you can see the scars.
What's happening with upper coil-over mounts ? OR a transverse spring ???
I LIKE your work Pete !
-
michael037
- Member
- Posts: 534
- Joined: Mon Jul 25, 2005 4:52 pm
- Location: wagga wagga nsw australia
Re: Model A Tourer Build
Pete
Good to see those Arthur Byrnes parts being used. I can see the lower door post patch panels in there also.
Michael
Good to see those Arthur Byrnes parts being used. I can see the lower door post patch panels in there also.
Michael
-
toprodz
- Old Hand
- Posts: 2604
- Joined: Sun Mar 23, 2003 10:44 am
- Location: Wallan Victoria 0412 81 1932
Re: Model A Tourer Build
Hi Greg N SmithGreg N Smith wrote:Hi SimonG
Are you talking about Pete TopRodz OR the Model A Tourer ?
I did intend to keep my legs original but both my legs have got many stories to tell ... Kombi Van vs motorbike ... Deer vs motorbike ... Truck vs leg etc ...
McDonald Bros upper and lower arms look good and your crossmember has your signature welding "tags"SimonG wrote:I like the idea of leaving the body natural Pete as I think they tell more of a story when you can see the scars.
What's happening with upper coil-over mounts ? OR a transverse spring ???
I LIKE your work Pete !
Thanks for the kind words
The crossmember still has to have the lower section wrapped in 4mm steel, as the top was tacked together so as to allow the arms to be made, then it will be completely welded and sanded to finish it.
I am planning on using a coil over "style shock" that has been designed by a mate in the USA, which doesn’t have any springs, just nitrogen and oil, and will mount the same as a coil over shock. hopefully they will be finished by the time I need them
Regards
Peter Gough
FOUNDING MEMBER #24 OZ-E-RODDERS ROD & KUSTOM CLUB
Peter Gough
FOUNDING MEMBER #24 OZ-E-RODDERS ROD & KUSTOM CLUB
-
gassman
- Posts: 88
- Joined: Sun Jun 29, 2008 6:11 pm
- Location: gold coast qld
Re: Model A Tourer Build
....i like this alot. ....especially doing a jag rear...
...it seems no-one does it any more.??? .my "dad and son project" 28 roadster looks like it getting one...
...a freebie...thanks for putting your work up for all to see..
...it seems no-one does it any more.??? .my "dad and son project" 28 roadster looks like it getting one...
...a freebie...thanks for putting your work up for all to see..
'Political correctness is a doctrine, fostered by a delusional, illogical minority, and rapidly promoted by mainstream media, which holds forth the proposition that it is entirely possible to pick up a piece of shit by the clean end.'