Dad-bud builds a rod
-
Twin Spinner
- Senior Member
- Posts: 1445
- Joined: Mon Jan 02, 2012 7:45 pm
- Location: Brisbane.
Re: Dad-bud builds a rod
Unique' This is what rod building is all about...love it 

If it has tits or wheels, you can expect trouble.
-
Gojeep
- Old Hand
- Posts: 7220
- Joined: Mon Jan 07, 2008 1:24 pm
- Location: Eastern Suburbs of Melbourne
- Contact:
Re: Dad-bud builds a rod
With all the track marks in your door skin, it could be just the lack of support while you are wheeling it. It makes a huge difference even with the same radius wheel to how much crown you are adding in each pass. I'd say you were doing it by yourself and letting it droop?
Marcus
To try where there is little hope, is to risk failure.
Not to try at all, is to guarantee it!
____| \______\
|/¯\ |¯ |----O||||O
()_)-o-)¯¯()_)-o-)_)
To try where there is little hope, is to risk failure.
Not to try at all, is to guarantee it!
____| \______\
|/¯\ |¯ |----O||||O
()_)-o-)¯¯()_)-o-)_)
-
Dad-bud
- Posts: 157
- Joined: Mon Jul 07, 2014 2:33 pm
- Location: Wangara, Perth, WA
Re: Dad-bud builds a rod
Yep, spot on. I was aware of it but other than wait for someone to help me, not much choice.Gojeep wrote:With all the track marks in your door skin, it could be just the lack of support while you are wheeling it. It makes a huge difference even with the same radius wheel to how much crown you are adding in each pass. I'd say you were doing it by yourself and letting it droop?
Pretty poor excuse on my part I know but there's not many people around my workshop and as this is my first car I've built, I'll be learning from it.
Cheers
Perth, WA
-
jailbar joe
- Old Hand
- Posts: 3440
- Joined: Sat Oct 24, 2009 8:33 pm
- Location: york west aus
Re: Dad-bud builds a rod
hi graeme i posted something earlier but later when i looked it had dissapeared?????
i reckon you have got the knack now don't be bashful about beating into submission....sometimes you need to be brutal
when i was building the nose for gary glitter i soon learnt when to stop bashing and instaed make it in as many pieces that made it easier then welded it together.
it didn't make me feel a failure...at least i had a go....i don't need to punish myself....thats gods job
does karen know you are using her good bedspread ???
looking sreiously good mate
i reckon you have got the knack now don't be bashful about beating into submission....sometimes you need to be brutal
when i was building the nose for gary glitter i soon learnt when to stop bashing and instaed make it in as many pieces that made it easier then welded it together.
it didn't make me feel a failure...at least i had a go....i don't need to punish myself....thats gods job
does karen know you are using her good bedspread ???
yep a pic of your fridge...so i know when to come for another visitDad-bud wrote: If there's anything I've missed and you want to see, let me know and I'll try to grab a pic of it.
looking sreiously good mate
cheers joe
if you do nothing then nothing happens
if you do nothing then nothing happens
-
Dad-bud
- Posts: 157
- Joined: Mon Jul 07, 2014 2:33 pm
- Location: Wangara, Perth, WA
Re: Dad-bud builds a rod
Joe, trust me, the frig is stocked ready for you to visit anytime matejailbar joe wrote:hi graeme i posted something earlier but later when i looked it had dissapeared?????
i reckon you have got the knack now don't be bashful about beating into submission....sometimes you need to be brutal
when i was building the nose for gary glitter i soon learnt when to stop bashing and instaed make it in as many pieces that made it easier then welded it together.
it didn't make me feel a failure...at least i had a go....i don't need to punish myself....thats gods job
does karen know you are using her good bedspread ???
yep a pic of your fridge...so i know when to come for another visitDad-bud wrote: If there's anything I've missed and you want to see, let me know and I'll try to grab a pic of it.
looking sreiously good mate
Perth, WA
-
Chrisso
- Old Hand
- Posts: 4178
- Joined: Thu Apr 12, 2012 10:44 am
- Location: Albury NSW
Re: Dad-bud builds a rod
I think you are being a little harsh on yourself Graeme I would have no hesitation in riding shotgun, awesome work IMHO. 
-
FRANK BASILE

- Old Hand
- Posts: 13896
- Joined: Wed May 07, 2003 3:14 pm
Re: Dad-bud builds a rod
The fear of mucking up has certainly been shoved aside with those results. Good work.
OZ-E-Rodders Rod and Kustom Club Member #31
-
King Willy
- Senior Member
- Posts: 1042
- Joined: Fri Jan 25, 2008 2:11 pm
- Location: Forest Lake QLD
Re: Dad-bud builds a rod
Bloody fantastic work right here! Super cool.
-
Gojeep
- Old Hand
- Posts: 7220
- Joined: Mon Jan 07, 2008 1:24 pm
- Location: Eastern Suburbs of Melbourne
- Contact:
Re: Dad-bud builds a rod
I have to do everything by myself too and can be very hard supporting a panel that size. I'm lucky to have long arms to get the support I need.Dad-bud wrote:Yep, spot on. I was aware of it but other than wait for someone to help me, not much choice.Gojeep wrote:With all the track marks in your door skin, it could be just the lack of support while you are wheeling it. It makes a huge difference even with the same radius wheel to how much crown you are adding in each pass. I'd say you were doing it by yourself and letting it droop?
Pretty poor excuse on my part I know but there's not many people around my workshop and as this is my first car I've built, I'll be learning from it.
Cheers
Also a hint on using hammer forms. You want to do a little at a time and work it so you have lots of little puckers forming rather than big ones. Use a soft blow mallet so as not to stretch the material.
Marcus
To try where there is little hope, is to risk failure.
Not to try at all, is to guarantee it!
____| \______\
|/¯\ |¯ |----O||||O
()_)-o-)¯¯()_)-o-)_)
To try where there is little hope, is to risk failure.
Not to try at all, is to guarantee it!
____| \______\
|/¯\ |¯ |----O||||O
()_)-o-)¯¯()_)-o-)_)
-
Dad-bud
- Posts: 157
- Joined: Mon Jul 07, 2014 2:33 pm
- Location: Wangara, Perth, WA
Re: Dad-bud builds a rod
I've seen a You-tube video recently where someone was wheeling a medium size panel alone and they had built a table around anvil-height on the other side. It seemed like a pretty good solution which I plan to employ on future panels.Gojeep wrote:I have to do everything by myself too and can be very hard supporting a panel that size. I'm lucky to have long arms to get the support I need.
Also a hint on using hammer forms. You want to do a little at a time and work it so you have lots of little puckers forming rather than big ones. Use a soft blow mallet so as not to stretch the material.
Thanks for the tip on using hammer forms. I use a rubber mallet or plastic faced dead-blow hammer when tipping metal over edges, dressing it down about 10 degrees each pass along the form edge - if the width to be tipped over is over about 15mm or so, I find the puckers end up quite big which makes them difficult to get rid of. I usually resort to the shrinker to work them away. I probably don't have the right technique to shrink the metal just using the hammer form alone.
On the firewall, up around the 'top corners', I ended up cutting out the 'over-puckered' section and welded in a replacement flat piece. I know it's not the right way.
Maybe one day I'll learn, in the meantime I'll bumble through with the tools I have.
I do appreciate helpful suggestions though, so thanks.
Perth, WA
-
Gojeep
- Old Hand
- Posts: 7220
- Joined: Mon Jan 07, 2008 1:24 pm
- Location: Eastern Suburbs of Melbourne
- Contact:
Re: Dad-bud builds a rod
No worries. Just passing on what I have learnt as no expert that is for sure. I was fortunate to have Peter Tommasini school me when I was learning to wheel. He was always making sure I was supporting the panel correctly and evenly too.
Wray had the video you speak of with the support box to help when alone.
Wray had the video you speak of with the support box to help when alone.
Marcus
To try where there is little hope, is to risk failure.
Not to try at all, is to guarantee it!
____| \______\
|/¯\ |¯ |----O||||O
()_)-o-)¯¯()_)-o-)_)
To try where there is little hope, is to risk failure.
Not to try at all, is to guarantee it!
____| \______\
|/¯\ |¯ |----O||||O
()_)-o-)¯¯()_)-o-)_)
-
Dad-bud
- Posts: 157
- Joined: Mon Jul 07, 2014 2:33 pm
- Location: Wangara, Perth, WA
Re: Dad-bud builds a rod
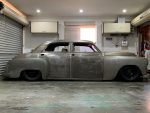
Update time.
We've all been wrestling with the dreaded Covid-19 stuff over the last month or so and I am happy to say that things are looking a little brighter here in WA. No raising of restrictions just yet but the feeling is it won't be long. That said, it has had little impact on me. Apart from stopping attending club and ASRF meetings as well as our weekly club Saturday morning breakfasts, I have been heading up to my little workshop almost every day.
That doesn't mean I've achieved a lot but................
I've made the second door. It still needs some work - I didn't dress the skin down very well onto the frame so it doesn't match the cowl very well. I've worked out my fix for that though, just gotta get round to it.
I got my son to give me a hand to bead roll the front edge of the cowl top to match the sides. Not very exciting and I still haven't fitted it to the firewall / cowl but it sits in place quite well and I reckon it should go OK.
I've also had a go at starting the rear quarters. Just a start mind you.
The piece of the body that was always going to be my biggest headache was the rear quarters. There's lots of shrinking / shaping to get them to look right and this is the area where my skills are probably the weakest.
Taking advice from those with more experience, I thought I'd break it down into smaller portions. I grabbed a bit of scrap to see if I could shape and fit the bottom corner which has to fit under and around a corner as well as blend into the wheelarch and section below the bootlid. While my attempt will need to be remade as the scrap piece was too small, it encouraged me to keep moving forward along those lines.
I figured I'd break the panel about half way over the curve from the 'horizontal' section next to the boot opening down to the 'vertical' section above the wheelarch - this would give me a long weld through the middle of the curve but access for dressing weld and metal finishing would be relatively easy. So, cut up some board to get a template and cut out some metal. Bent the edge over to sit down into the boot opening and cut around framing used to form the boot opening.
The blue line you see is the 'edge' of where I need to start shrinking to form the curve down over the side. Before starting that though, I needed to fit the front edge over/around the rolled rear of the passenger compartment.. That meant a bit of bending up an edge and shrinking it a little to fit.
Next was to fit it to the curve of the boot opening .............. baby steps at first. Used my shrinker to pull it down.
You do not have the required permissions to view the files attached to this post.
Perth, WA
-
Dad-bud
- Posts: 157
- Joined: Mon Jul 07, 2014 2:33 pm
- Location: Wangara, Perth, WA
Re: Dad-bud builds a rod
A fair bit of shrinking (and some re-stretching at times) to get the shape right to match the curve of the frame beside the boot.
That was the easy part. Next, to start actual metal shaping.
I've got a couple of shrinking stumps and a shipload of hammers. I've watched plenty of videos on You-tube so it should be easy, right? All you do is hit the metal to form a tuck then hammer the tuck down. Only, it's not that easy. A combination of poor technique and not having a very good hammer meant that I could form a proper tuck and when I tried to hammer it down all I ended up doing was just flatten the tuck.
I tried time and again - hitting it with different hammers and even made one which ended up being too heavy and ended up stretching the metal where I hit it rather than form tucks. I'd previously made a tuck-tool which I tried to some mild success.
The downside to using a tuck-tool is the ends of the tool (well, my one anyway) mar the metal when you pull a tuck. It's probably a product of the tool and operator error but forming tucks on the stump is preferred. So, experimenting with making more hammers until I finally started forming tucks that I could hammer down. Some degree of success was achieved.
You do not have the required permissions to view the files attached to this post.
Perth, WA
-
Dad-bud
- Posts: 157
- Joined: Mon Jul 07, 2014 2:33 pm
- Location: Wangara, Perth, WA
Re: Dad-bud builds a rod
I tried planishing the tucks and shrinks and then checked the fit. With my lack of technique, it became obvious that fitting the section to the body frame needed targeted shrinking so I took the piece over to my shrinker/stretcher to see if it might work. First thing I noticed was that the shrinker helped smooth out the previous marks and imperfections though the teeth that grab the metal to shrink it do form their own marks - even though these are relatively small.
It also allowed me to shrink just where it was needed rather than the gross shrinks used by the tuck and shrink method. Successive bouts of shrinking have allowed me to get the shape almost there. I'd put it at about 95% and I must say I'm pretty pleased with the results.
One advantage to allowing my blank panel to be a bit oversized is that the curve over from top to side runs down the side a bit further which means that the shrinking required to the upper edge of the side panel is that much less.
I am really chuffed with the upper panel - the shape fits really quite well and it shows me that the bodywork should come out reasonably - not show quality, but that's not what I'm aiming for anyway. I'm still just hoping for not being embarrassed to drive it.
Anyway, I had some paper which I cut up into a template for the side and taped it on - it shows what the rear quarter should end up looking like.
You do not have the required permissions to view the files attached to this post.
Perth, WA
-
Sly Fox
- Senior Member
- Posts: 1923
- Joined: Sat Apr 24, 2010 7:10 pm
- Location: Castle Hill, NSW
Re: Dad-bud builds a rod
Give yourself a pat on the back, that came out great.
Not a job I'd like to tackle and the car is going to be amazing when finished
Not a job I'd like to tackle and the car is going to be amazing when finished
51 Dodge Custom & 63 EH Ute - Dare to be different