I'm not far off building a chassis table and am looking for examples of what others have done. I like the idea of a ladder-type arrangement so I can get underneath, rather than the full plate deck. I'm thinking 100x100x2.5 RHS rails with 100x50x2 RHS "rungs".
Should the rails suit the track width (to sit the wheels on to set suspension height) or suit the chassis width with outriggers for the wheels?
My garage floor has a slight fall so I'll use some threaded caravan stands I picked up at the swap meet as legs and to allow me to level it.
Happy to take feedback.
Show us your chassis tables!
-
BLWNHR

- Posts: 214
- Joined: Sun Mar 30, 2008 2:32 pm
- Location: Launceston, TAS.
- Contact:
-
steve the ford guy

- Senior Member
- Posts: 1576
- Joined: Mon Apr 19, 2010 9:36 pm
Re: Show us your chassis tables!
Back in 2016 I took some drawings to the local engineering shop and gave the go ahead for them to build a chassis table. This took three months to complete as the steel plate for the top was delayed on backorder.
Just before the table was finished I watched a news story showing Nigel Farage placing a Ladbrokes bet for the Leave vote to win the Brexit poll in Britain. Given my birthdate coincided with the polling day, I thought I might place a bet. No local agents handled bets for the poll so I joined Ladbrokes online and transferred money into their account. I won enough to easily cover the cost of the chassis table.
Just before the table was finished I watched a news story showing Nigel Farage placing a Ladbrokes bet for the Leave vote to win the Brexit poll in Britain. Given my birthdate coincided with the polling day, I thought I might place a bet. No local agents handled bets for the poll so I joined Ladbrokes online and transferred money into their account. I won enough to easily cover the cost of the chassis table.
-
Dad-bud

- Posts: 157
- Joined: Mon Jul 07, 2014 2:33 pm
- Location: Wangara, Perth, WA
Re: Show us your chassis tables!
Hey BLWNHR,
A chassis table is a great thing to use to work on your chassis. Like you, I collected some 100 x 100 RHS to use as a frame.
However, before I made the steel one, I was using an old timber table that I had inherited with the small factory unit I bought. It was 2400 x 1200 and was useful enough though a bit low.
I put some castor wheels under it to make it easy to move around which also raised it up to a better height for me.
I then braced the legs with some scrap timber I had and extended it with a couple of selected (straight) long timber beams - I ended up making it 4200 x 1200 which proved about right. I put some ply sheeting on top, making sure it was flat and straight.
This gave me a blank canvas upon which I could set out the chassis using tape, etc to mark axle centrelines and where the steps in the rails needed to be.
I had someone who thinks he knows what's going on (though has never actually built a car) tell me that there was no way I could use a timber table to build a chassis on. I didn't do it to prove him wrong but my chassis turned out flat and square and I'm still using the table as a layout space. It's light enough to push around easily and it is strong enough that I sat the Windsor and C-4 on it to set up the engine mount, etc. Same with the diff. Having a flat surface on top allows you to easily support things like the motor, etc though it does mean you can't weld underneath while the frame is on the table.
Now, I'm not recommending you build a timber table but from my experience, it kinda doesn't matter so much what you use - everyone will have an opinion on what you should do. Chassis jigs to which you can fit the rails and then build and fit the crossmembers are really useful for that part of the build but you will find that a chassis table takes up quite a lot of space (about a car size really), so it depends on how much space you have to spare what to do with it once the chassis is on its wheels.
This is an interesting thread, so I'll keep an eye on the various responses you get.
Cheers.
You do not have the required permissions to view the files attached to this post.
Perth, WA
-
BLWNHR
- Posts: 214
- Joined: Sun Mar 30, 2008 2:32 pm
- Location: Launceston, TAS.
- Contact:
Re: Show us your chassis tables!
Thanks for your detailed and considered response Dad-bud.
I have very little space! I do need to build one though, I need to basically rebuild the chassis from the firewall forward and the diff back, so need something rigid to mount it all to.Dad-bud wrote:Chassis jigs to which you can fit the rails and then build and fit the crossmembers are really useful for that part of the build but you will find that a chassis table takes up quite a lot of space (about a car size really), so it depends on how much space you have to spare what to do with it once the chassis is on its wheels.
Adam
-
toprodz

- Old Hand
- Posts: 2604
- Joined: Sun Mar 23, 2003 10:44 am
- Location: Wallan Victoria 0412 81 1932
Re: Show us your chassis tables!
I have always used a ladder type jig that is also mounted like a rotisserie so that you can access the underneath easier, The first one I made was on legs, the legs lasted about 2 weeks until it was converted
The one I use now is made from 6" x 4" x 4mm RHS with 10mm plates laser cut with 1/2" holes in a set pattern to be able to change and add different fixtures,
I always set the chassis up about 3" to 4" above the top and make the main flat section of the rails level with the top and have welded uprights direct to the jig, when setting up the first side so that you can take any twist or bends out and have the same height reference from the top of the rail to the top of the jig along the length of the rail, then I set up the opposite side at the same heights as well as checking the diagonal measurements at the same time, I also use a string line in a cross pattern to check for twist of the frame before I tack weld the rails to the uprights so they won't move while fabricating as camps tend to come loose and you never have enough of them


If you have any questions I might be able to help with just ring me 0412 81 1932 Peter
The one I use now is made from 6" x 4" x 4mm RHS with 10mm plates laser cut with 1/2" holes in a set pattern to be able to change and add different fixtures,
I always set the chassis up about 3" to 4" above the top and make the main flat section of the rails level with the top and have welded uprights direct to the jig, when setting up the first side so that you can take any twist or bends out and have the same height reference from the top of the rail to the top of the jig along the length of the rail, then I set up the opposite side at the same heights as well as checking the diagonal measurements at the same time, I also use a string line in a cross pattern to check for twist of the frame before I tack weld the rails to the uprights so they won't move while fabricating as camps tend to come loose and you never have enough of them
If you have any questions I might be able to help with just ring me 0412 81 1932 Peter
Regards
Peter Gough
FOUNDING MEMBER #24 OZ-E-RODDERS ROD & KUSTOM CLUB
Peter Gough
FOUNDING MEMBER #24 OZ-E-RODDERS ROD & KUSTOM CLUB
-
Oldcol
- Old Hand
- Posts: 9194
- Joined: Tue Jan 10, 2006 8:31 pm
- Location: Warragul,Vic.
Re: Show us your chassis tables!
I can't show you a pic of my chassis bench although I still have it....but it's been repurposed as a bench..... 
....but you can see the main side frame, it's in there under the benchtop .

....but you can see the main side frame, it's in there under the benchtop .
-------------
Col....
"Works" comes before "looks good", cos "looks good" changes, and "works" works!
Col....
"Works" comes before "looks good", cos "looks good" changes, and "works" works!
-
jailbar joe
- Old Hand
- Posts: 3440
- Joined: Sat Oct 24, 2009 8:33 pm
- Location: york west aus
Re: Show us your chassis tables!
interesting subject this....when i built /modified my chassis for my little car i did not use a chassis table or jig......
just chopped it up and welded it on the floor....came out square and true.....
after doing this i thought maybe i should build a chassis jig and then my thoughts turned to what materials and how to build it,
my original thought was to find an old truck chassis coz they are usually long and flat and use that as a base,just adding cross bars at
the approriate places....reasonably quick and being on wheels...movable...i know the wheels stick out and all that...but a problem for down the road.
then after a bit more thought...i said to myself...WHY...how many chassis am i going to build....how many life times do i have to keep building cars,
why go to all that expense and work for something to use RARELY....other than to load up with junk....i already built a car with no table and it came out well.
so after all that i opened another beer and did more meaningful stuff
cheers joe
if you do nothing then nothing happens
if you do nothing then nothing happens
-
Maffra
- Old Hand
- Posts: 2759
- Joined: Mon Jan 28, 2008 11:18 am
- Location: Ivanhoe, Victoria
Re: Show us your chassis tables!
jailbar joe wrote:
so after all that i opened another beer and did more meaningful stuff
Maffra
. . . . Living and Learning . . . .
Member of Oz E Rodders Street Rod and Kustom Club
. . . . Living and Learning . . . .
Member of Oz E Rodders Street Rod and Kustom Club
-
BLWNHR
- Posts: 214
- Joined: Sun Mar 30, 2008 2:32 pm
- Location: Launceston, TAS.
- Contact:
Re: Show us your chassis tables!
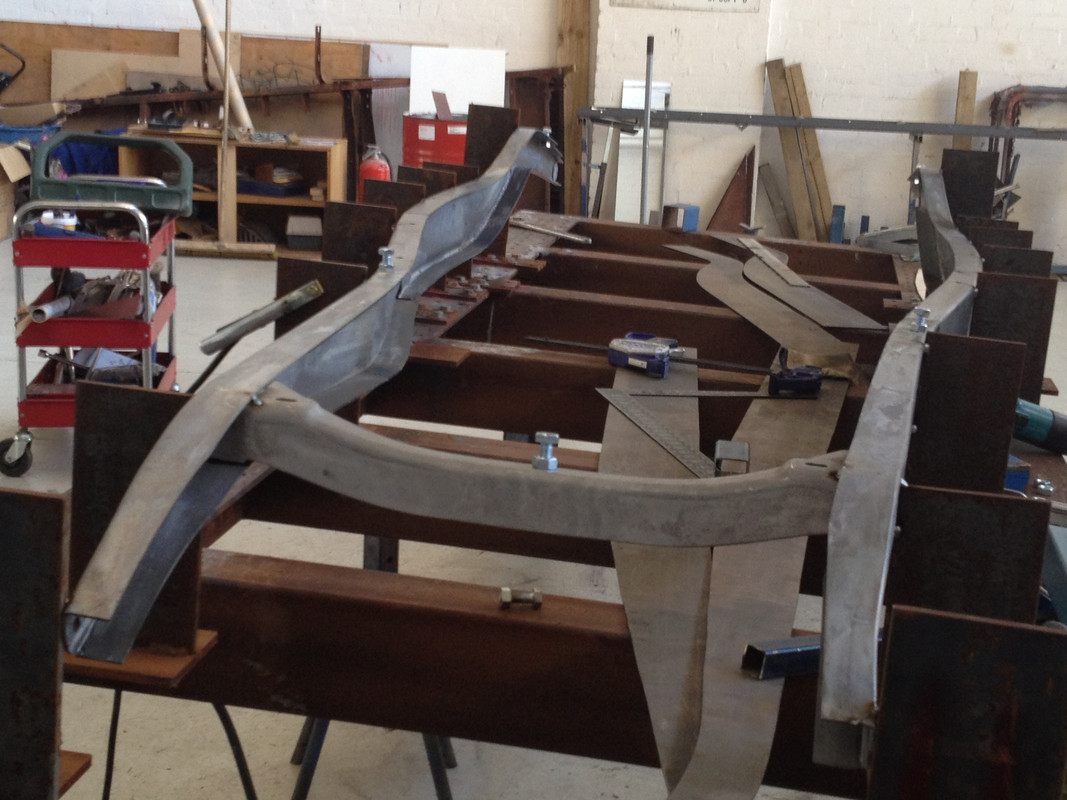
Thanks Peter. I really like the idea of the fins in pictures 2 & 3, rather than RHS for the verticals, it allows much clearer access to the side of the rails.toprodz wrote:I have always used a ladder type jig that is also mounted like a rotisserie so that you can access the underneath easier
Adam
-
rx4ord

- Old Hand
- Posts: 6853
- Joined: Tue Jan 11, 2005 8:08 pm
- Location: Tasmania! Tasmania!
Re: Show us your chassis tables!
Did exactly the same Joe and it came out a couple of mm
out corner to corner.
Nuffin' to worry about.
Drank more bourbon and saved a shitload of steel.
Tassie Dave
out corner to corner.
Nuffin' to worry about.
Drank more bourbon and saved a shitload of steel.
Tassie Dave
Founding Member of OZ-E-Rodders
-
pilot48
- Posts: 195
- Joined: Sun Feb 19, 2012 9:01 am
Re: Show us your chassis tables!
I found that having the table high enough and open enough to sit under to be able to work from underneath is a bonus for checking clearances of sumps tail shafts ect. I all so have adjustable feet for levelling.
-
tub1935
- Posts: 487
- Joined: Sat Aug 20, 2005 8:02 pm
- Location: tasmania
Re: Show us your chassis tables!
good aye mate , first of all what type of chassis are you building ?, is yours damaged in any way ? are you joining on another suspension set up ie jag , holden bolt in type or a aftermarket new suspension .or a frame graft hq type .if it was me and I wanted to only do one build, most chassis have a flat section on the bottom or top of the chassis under the main body of the car truck etc behind the fire wall up to the from rear spring mount area , usually this area would be 4 to 6 ft long. now get your self a side elevation view of the chassis from a repair manual it will give you lots of measurements , and also a plan view of the chassis for diagonal measurements , if my memory serves me correctly +or - 1/4 in for every 3ft of the chassis is square for a car /truck etc . now you have all you need find out if you chassis is square if not straighten it with a porta power /jack / turn buckle or if its real bent take to a repair shop get them to pull it on a bench / rack or what ever they have . now next thin is refer back to the side elevation the will be measurements between holes etc .after you have found 2 holes, 1 each end of the flat chassis section get your self some steel 2in angle iron about 3ft 6in long and weld some steel plates to the bottom to form feet drill a hole on each corner . now jack the chassis up on blocks timbers etc till the top of the chassis is about the level with the top of your angles set your chassis flat area to level with a spirit level, clamp the chassis side to the angle drill a hole through the angle to match a bolt hole in the chassis and bolt it together , while retaining the spirit level to keep a eye on things being level now using them strange big screw thingys that go into concrete bolt the sucker to the floor , remembering to recheck for level you can loosen the angry big screws and pack for squareness .now this may seem a lot of monkeying around but it will work the same as the really cool steel work bench that steve showed us in another thread fixin his 39 van . I know this may seem a bit of work but it is a cheap easy option if ya only doing one build , now you have got the sucker so it cant get away from you you can drop down a plum bob to mark out on the floor for measurements , centre line , datum line for side measurements etc if you want to remove a bit of chassis to fix a problem like steve did to install a different front suspension make another couple of angle supports and bolt them down etc before cutting out the bit of chassis . I'm sure some will roll there eyes and say I'm crazy but the way I'm talking about is convenient you can crawl under no probs to weld or whatever you can jack up a front end to the chassis to install it , work your ride height etc with you build sitting at bench height . remember pythagorus therum a 3 , 4 , 5 triangle is your friend when your doing calculations over the size of a chassis for things being true or square . now ive probally bored you to tears and you think who is this idiot !!! revisit steves wonderful bench ie a very professional setup its the ducks guts and people who know the body repair chassis repair trade would envy it .but for a one off build you have a concrete one in your garage , now you being Tasmanian you know of andy morris rip remember his cars were built on a dirt floor . if ya want to tell me I'm stupid pm me ill send you my phone number kind regards scott 
-
BLWNHR
- Posts: 214
- Joined: Sun Mar 30, 2008 2:32 pm
- Location: Launceston, TAS.
- Contact:
Re: Show us your chassis tables!
Hi Scott, thanks for the response.tub1935 wrote:first of all what type of chassis are you building ?, is yours damaged in any way ? are you joining on another suspension set up ie jag , holden bolt in type or a aftermarket new suspension .or a frame graft hq type .
It's a 1951 F1 chassis. It's a bit twisted at the very back, had the rear spring hangers hacked off, a very bad C-notch through 3/4 of the rail then it's been jacked up from the back and folded at this point. It's had a Camaro front graft from the firewall forward, which is cracked through one half of the rail. It's in a sad way and needs a lot of work, but I've had no luck finding another one.
It will need the graft chopped off, new rails from the firewall forward fabricated. I'm running Jag front so at least I can make the rails suit this. The rear needs heaps of work. It needs to be kicked up, narrowed and a subframe built from scratch to suit an IRS that I'm fabricating. There's a lot in getting this geometry right.
I like your idea but it won't really work for me. The floor of my garage is on a fall so if I set the rails up horizontal I don't have a datum plane to measure up from to set heights of things. Second, I'm tight on space and will probably need to move the chassis mid-fabrication, having it bolted to the floor doesn't really work for this.
Adam
-
Oldcol
- Old Hand
- Posts: 9194
- Joined: Tue Jan 10, 2006 8:31 pm
- Location: Warragul,Vic.
Re: Show us your chassis tables!
Hmm...sounds like a lovely chassis , pity you can't scare up another one, but just to expand your choice, Jailbar pickup are essentially the same frame, just longer rails ahead of the front end for the bumper position, which is easily fabricated. Back to the table, saw a guy one time who used his tandem trailer for a base of a jig, sounds a bit dodgy but as long as you levelled it up properly , it'd work. And in your case if it gets in the way, you can wheel it outside. For a one time build, a table is an extravagance, it's not hard to build or rebuild and box a frame just using a couple of trestles to get it up off the floor. It's just a question of staggering welds , offset them too and wait until they are cool to touch before you do anymore, which is what you should do anyway even with a jig. Folks think the jig is the be all end all answer, but you can still fuck things up if you go gung-ho with the welding, induced stresses will still be there and when you cut it from the jig it'll pull wherever its stressed the most. I wouldn't like to say how many frames I built over the years without my jig/table.....lots....that's why it's now a bench,it's much more useful.
-------------
Col....
"Works" comes before "looks good", cos "looks good" changes, and "works" works!
Col....
"Works" comes before "looks good", cos "looks good" changes, and "works" works!
-
rx4ord
- Old Hand
- Posts: 6853
- Joined: Tue Jan 11, 2005 8:08 pm
- Location: Tasmania! Tasmania!
Re: Show us your chassis tables!
Good ideas there Scotty.Well written and explained.
I'm sure a few will learn a trick or two.
He's a clever bugger is Scot.Worked in the body industry for dinosaur years.
Said a while ago when I showed him a problem that had me buggered " cut it here and here".
Yep he was right and it all came together as it should.
Good idea on the tandem as well.
Solid and moveable.
Tassie Dave
Founding Member of OZ-E-Rodders