Fellas
I am rebuilding a Jag MK10 diff centre and fitting it to XJ6 series 1 swing arms with XJ40 hubs/drive shafts and outboard brakes.
The reason for doing this is to hopefully stop the oil leak that results from heat generated by the inboard brakes destroying the axle oil seals resulting in oil getting on the inboard disks and garage floor.
I can post up my progress in this forum if anyone is interested.
GB
Modifying a JAG IRS from Inboard Brakes to Outboard Brakes
-
grahamjb

- Posts: 226
- Joined: Sun Feb 17, 2013 8:40 pm
- Location: Perth
-
FX Panelvan

- Posts: 266
- Joined: Wed Apr 09, 2014 10:44 am
- Location: S E Qld
Re: Modifying a JAG IRS from Inboard Brakes to Outboard Brak
Hi Graham
Sounds like an interesting modification. I would like to see your progress.
By the way, Postimage works well for posting photos.
Sounds like an interesting modification. I would like to see your progress.
By the way, Postimage works well for posting photos.
regards
Brian
Brian
-
toprodz

- Old Hand
- Posts: 2604
- Joined: Sun Mar 23, 2003 10:44 am
- Location: Wallan Victoria 0412 81 1932
Re: Modifying a JAG IRS from Inboard Brakes to Outboard Brak
I am intersted in what you are doing, in saying that, I have seen a xj6 style diff with outboard barakes, I was looking at it and it took me minute or so to figure out what was different, as it was still in the cage which was the same as the earlier ones, I believe it was from a very late series 3 or from a late model XJS, it wouldn't hurt to ring a jag wrecker and ask the question.
Also you might find that after you move the brakes it might still leak oil, as it will still be an "English Design"


Also you might find that after you move the brakes it might still leak oil, as it will still be an "English Design"
Regards
Peter Gough
FOUNDING MEMBER #24 OZ-E-RODDERS ROD & KUSTOM CLUB
Peter Gough
FOUNDING MEMBER #24 OZ-E-RODDERS ROD & KUSTOM CLUB
-
grahamjb
- Posts: 226
- Joined: Sun Feb 17, 2013 8:40 pm
- Location: Perth
Re: Modifying a JAG IRS from Inboard Brakes to Outboard Brak
I have a series 1 Jaguar IRS fitted to my International AR-110 Coupe Ute that leaks oil from the LH output shaft. Apart from oil getting on the brake disk it leaves a small oil spot on the garage floor which is a pain.
I have replaced the seal and output shaft however the problem continues so I have decided to fit outboard brakes to stop heat damage to the output shaft oil seal which is caused when the inboard disks get hot. This is a known problem that was never successfully resolved until outboard disk brakes were fitted to the 1993 to 1996 XJ6.
The poms seem to make engineering hard by using a combination of needle bearings, spacers, taper bearings sometimes set up with pre-load and sometimes with end float, a mixture of different oil seals and shims wherever they can along with hub nuts fitted with helicoil inserts, tapered head bolts with holes for wire tying and so on. I have a late '60's diff centre out of a MK10 or a model around that era and will be mating it to series 1 swing arms and XJ40 half shafts and hubs with outboard disk brakes. All parts are in pretty bad shape and need rebuilding. The following posts are my way of making the bits all work together.
Starting with the diff I discovered that the oil was gritty and probably had absorbed brake dust through the leaking output shaft seals meaning that new bearings and seals will need to be fitted throughout. Out of curiosity I priced a rebuild from diff specialists and they all came in with prices starting at a staggering $2000..... Not going to pay that much to replace 8 bearings so I went and sourced new bearings which was time consuming and more expensive than what I thought at circa $370.
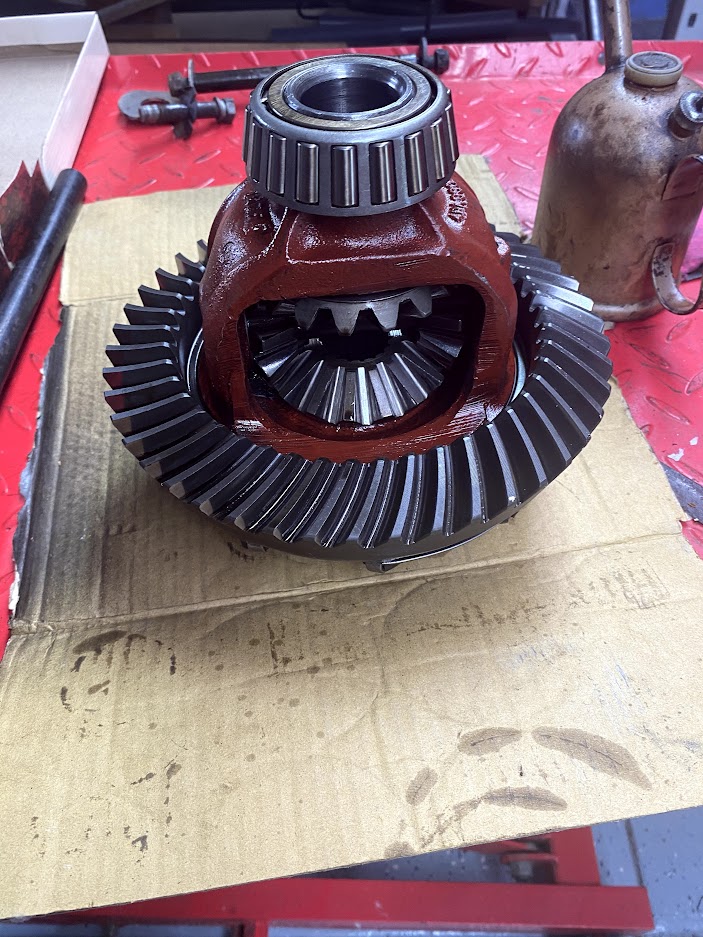
The photo below is the diff centre before I pulled it apart

The dismantled diff

I had to make a tube spanner to undo the output shaft nuts

These are the nuts for the spanner
Now for a lot of cleaning and removing old bearings
I have replaced the seal and output shaft however the problem continues so I have decided to fit outboard brakes to stop heat damage to the output shaft oil seal which is caused when the inboard disks get hot. This is a known problem that was never successfully resolved until outboard disk brakes were fitted to the 1993 to 1996 XJ6.
The poms seem to make engineering hard by using a combination of needle bearings, spacers, taper bearings sometimes set up with pre-load and sometimes with end float, a mixture of different oil seals and shims wherever they can along with hub nuts fitted with helicoil inserts, tapered head bolts with holes for wire tying and so on. I have a late '60's diff centre out of a MK10 or a model around that era and will be mating it to series 1 swing arms and XJ40 half shafts and hubs with outboard disk brakes. All parts are in pretty bad shape and need rebuilding. The following posts are my way of making the bits all work together.
Starting with the diff I discovered that the oil was gritty and probably had absorbed brake dust through the leaking output shaft seals meaning that new bearings and seals will need to be fitted throughout. Out of curiosity I priced a rebuild from diff specialists and they all came in with prices starting at a staggering $2000..... Not going to pay that much to replace 8 bearings so I went and sourced new bearings which was time consuming and more expensive than what I thought at circa $370.
The photo below is the diff centre before I pulled it apart
The dismantled diff
I had to make a tube spanner to undo the output shaft nuts
These are the nuts for the spanner
Now for a lot of cleaning and removing old bearings
-
grahamjb
- Posts: 226
- Joined: Sun Feb 17, 2013 8:40 pm
- Location: Perth
Re: Modifying a JAG IRS from Inboard Brakes to Outboard Brak
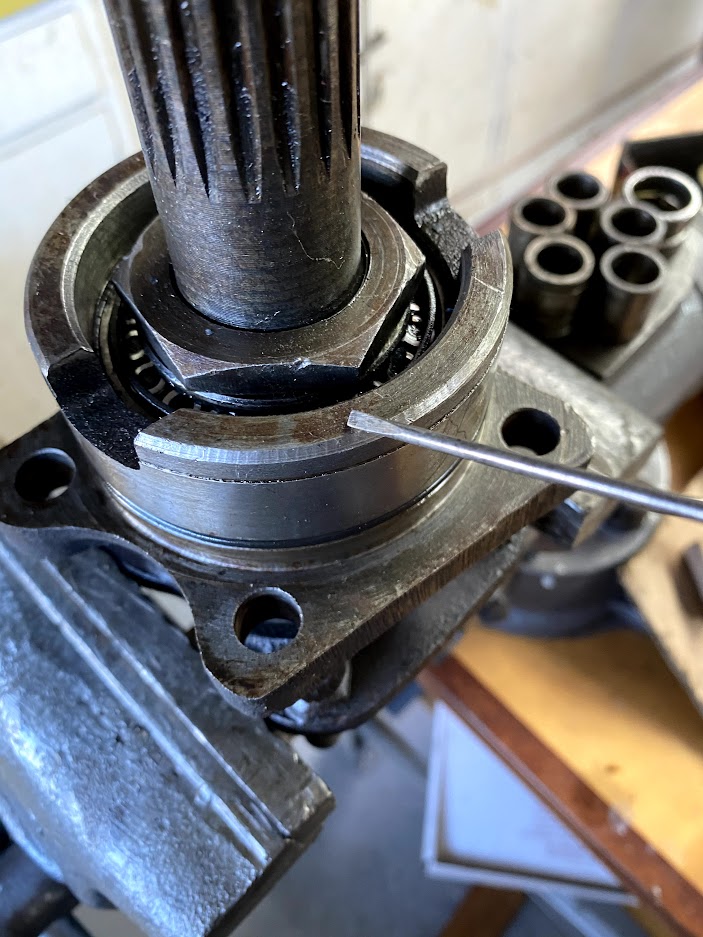
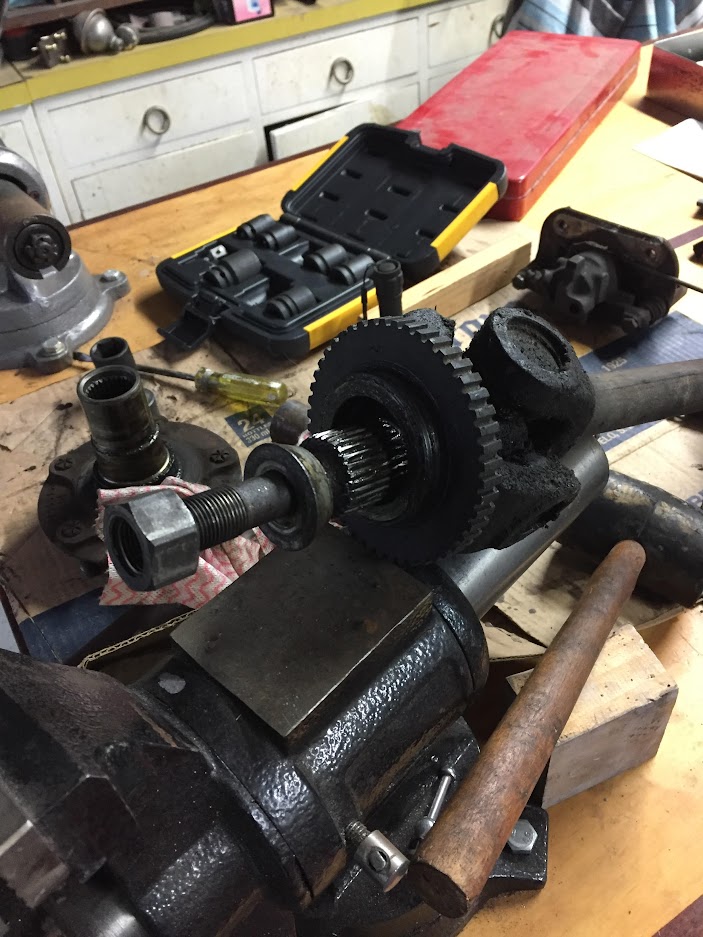
Removing the old bearings was tricky and I had to use some creative ways to get then all off.
This photo shows the oil slinger and outer pinion shaft bearing after removing the pinion nut and shaft

Inside view of old inner pinion bearing cup

Pinion shaft spacer and shims prior to removing old inner pinion bearing

Working out how to remove carrier bearing after I had removed the cage and rollers

Carrier bearings removed

Removing output shaft bearings

This photo shows the oil slinger and outer pinion shaft bearing after removing the pinion nut and shaft
Inside view of old inner pinion bearing cup
Pinion shaft spacer and shims prior to removing old inner pinion bearing
Working out how to remove carrier bearing after I had removed the cage and rollers
Carrier bearings removed
Removing output shaft bearings
-
grahamjb
- Posts: 226
- Joined: Sun Feb 17, 2013 8:40 pm
- Location: Perth
Re: Modifying a JAG IRS from Inboard Brakes to Outboard Brak
New inner pinion shaft bearing fitted
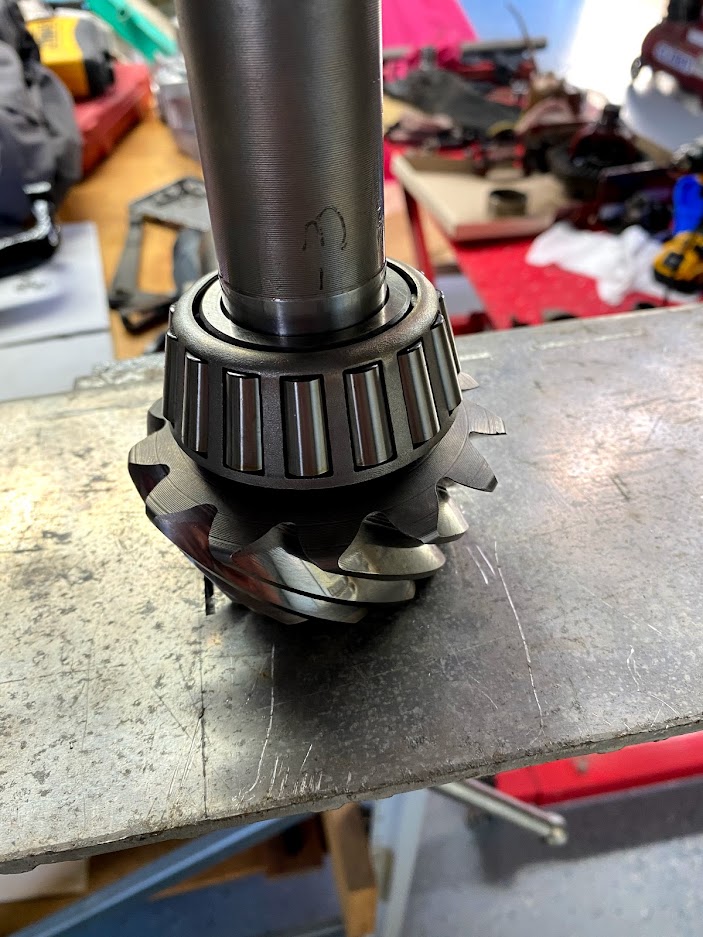
New Inner pinion bearing cup installed
Checking pinion height using a metal bridge across carrier bearing mount

Pinion bearing preload measurement - Pinion shaft has been fitted along with outer pinion bearing and shims. Pinion shaft is held in place using drive shaft flange and pinion nut and no pinion oil seal.
This photo shows bearing preload in clockwise direction
This is pinion preload in anti-clockwise direction

Note: Pinion preload is 8 - 12 lb in.
New Inner pinion bearing cup installed
Checking pinion height using a metal bridge across carrier bearing mount
Pinion bearing preload measurement - Pinion shaft has been fitted along with outer pinion bearing and shims. Pinion shaft is held in place using drive shaft flange and pinion nut and no pinion oil seal.
This photo shows bearing preload in clockwise direction
This is pinion preload in anti-clockwise direction
Note: Pinion preload is 8 - 12 lb in.
-
grahamjb
- Posts: 226
- Joined: Sun Feb 17, 2013 8:40 pm
- Location: Perth
Re: Modifying a JAG IRS from Inboard Brakes to Outboard Brak
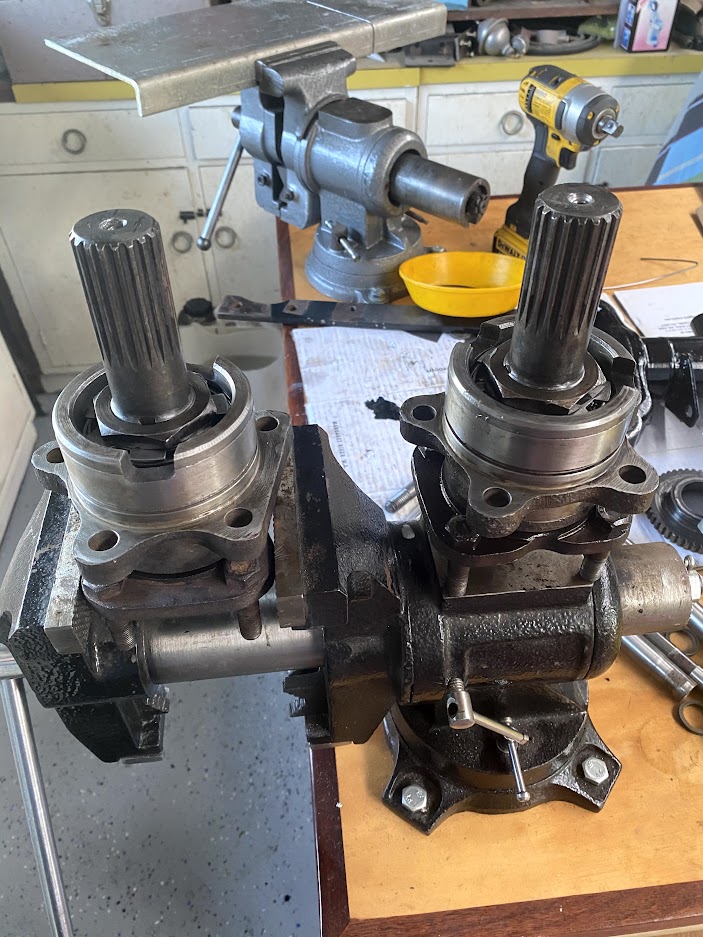
New carrier bearings fitted

Getting ready to adjust backlash before performing tooth mesh checks. I have to rebuild the output shafts to set the backlash because the output shaft bearing carriers are used to press against the carrier bearing cones to set the backlash.

I cant finish the output shaft rebuild today as I need to buy some adjustment shims - more posts in a few days
Getting ready to adjust backlash before performing tooth mesh checks. I have to rebuild the output shafts to set the backlash because the output shaft bearing carriers are used to press against the carrier bearing cones to set the backlash.
I cant finish the output shaft rebuild today as I need to buy some adjustment shims - more posts in a few days
-
grahamjb
- Posts: 226
- Joined: Sun Feb 17, 2013 8:40 pm
- Location: Perth
Re: Modifying a JAG IRS from Inboard Brakes to Outboard Brak
Output Shaft Bearings
Depending on what model Jaguar differential you have, the setup and installation of the taper bearings on the output shafts differs from end float using spacers and shims or pre-load using a crush tube. There is also the early series 1 XJ6 where roller bearings in lieu of taper bearings are used on the output shaft.
In the diff that I am using; to set the end float, you press on the inner bearing followed by the spacer and shims and then press on the outer bearing and measure the end float. You then remove the outer bearing and fit a shim that will give the correct end float (0.001" - 0.003") which is measured after the outer bearing has been refitted - this is repeated until the end float is correct.
Once you are happy with the end float, both bearings are removed from the output shaft, the inner bearing is placed loosely inside the bearing housing and the oil seal is fitted. The output shaft is fitted through the oil seal and the inner bearing is pressed back on to the shaft again. The spacer and shims are fitted followed by pressing the outer bearing back on to the output shaft. A locking washer and nut are then installed and the nut is done up "tight" and held in place by bending up a tab from the locking washer. To top it off, it is really difficult to measure the end float after the oil seal has been fitted and the nut done up tight.
This is time consuming and you run the risk of damaging new bearings as you press them on and off throughout the process. I find the bearings difficult to remove because they are opposed - e.g the outer bearing rollers are forced against the cone when you press the shaft through the bearing and there is only 1mm of inner bearing to grip with the bearing puller when you are pulling this bearing off.
Below are photos showing some of the steps
Removing the inner bearing

Both bearings removed from the output shaft
Measuring end float


Oil Seal and inner bearing loosley fitted to bearing housing - bottom view

Top view

Pressing inner bearing onto output shaft

Outer bearing fitted to output shaft

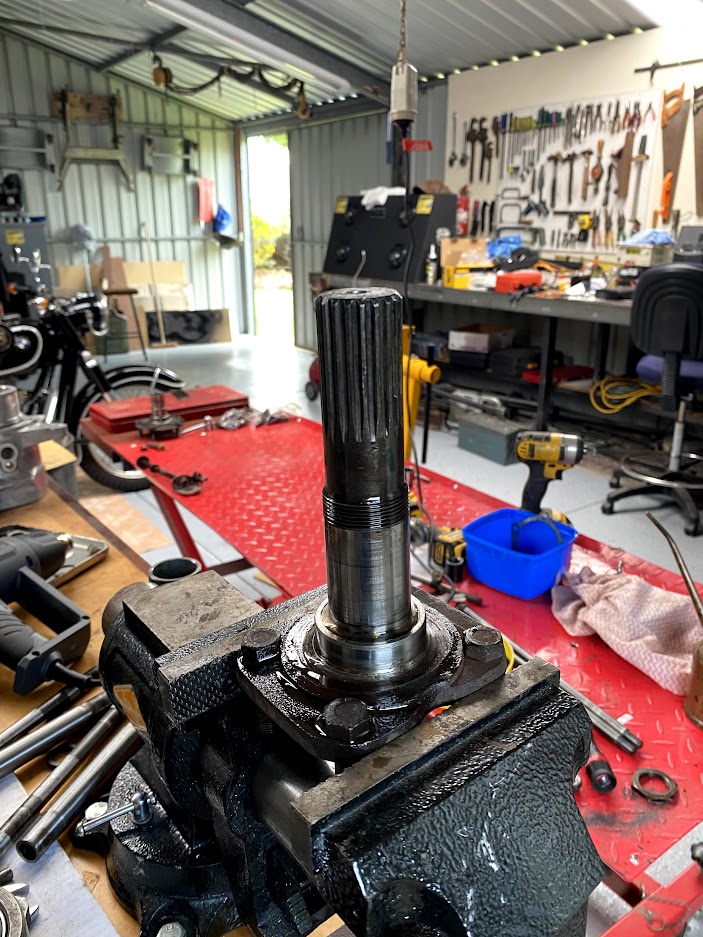
Both output shafts fitted with new bearings and oil seals
Depending on what model Jaguar differential you have, the setup and installation of the taper bearings on the output shafts differs from end float using spacers and shims or pre-load using a crush tube. There is also the early series 1 XJ6 where roller bearings in lieu of taper bearings are used on the output shaft.
In the diff that I am using; to set the end float, you press on the inner bearing followed by the spacer and shims and then press on the outer bearing and measure the end float. You then remove the outer bearing and fit a shim that will give the correct end float (0.001" - 0.003") which is measured after the outer bearing has been refitted - this is repeated until the end float is correct.
Once you are happy with the end float, both bearings are removed from the output shaft, the inner bearing is placed loosely inside the bearing housing and the oil seal is fitted. The output shaft is fitted through the oil seal and the inner bearing is pressed back on to the shaft again. The spacer and shims are fitted followed by pressing the outer bearing back on to the output shaft. A locking washer and nut are then installed and the nut is done up "tight" and held in place by bending up a tab from the locking washer. To top it off, it is really difficult to measure the end float after the oil seal has been fitted and the nut done up tight.
This is time consuming and you run the risk of damaging new bearings as you press them on and off throughout the process. I find the bearings difficult to remove because they are opposed - e.g the outer bearing rollers are forced against the cone when you press the shaft through the bearing and there is only 1mm of inner bearing to grip with the bearing puller when you are pulling this bearing off.
Below are photos showing some of the steps
Removing the inner bearing
Both bearings removed from the output shaft
Measuring end float
Oil Seal and inner bearing loosley fitted to bearing housing - bottom view
Top view
Pressing inner bearing onto output shaft
Outer bearing fitted to output shaft
Both output shafts fitted with new bearings and oil seals
-
grahamjb
- Posts: 226
- Joined: Sun Feb 17, 2013 8:40 pm
- Location: Perth
Re: Modifying a JAG IRS from Inboard Brakes to Outboard Brak
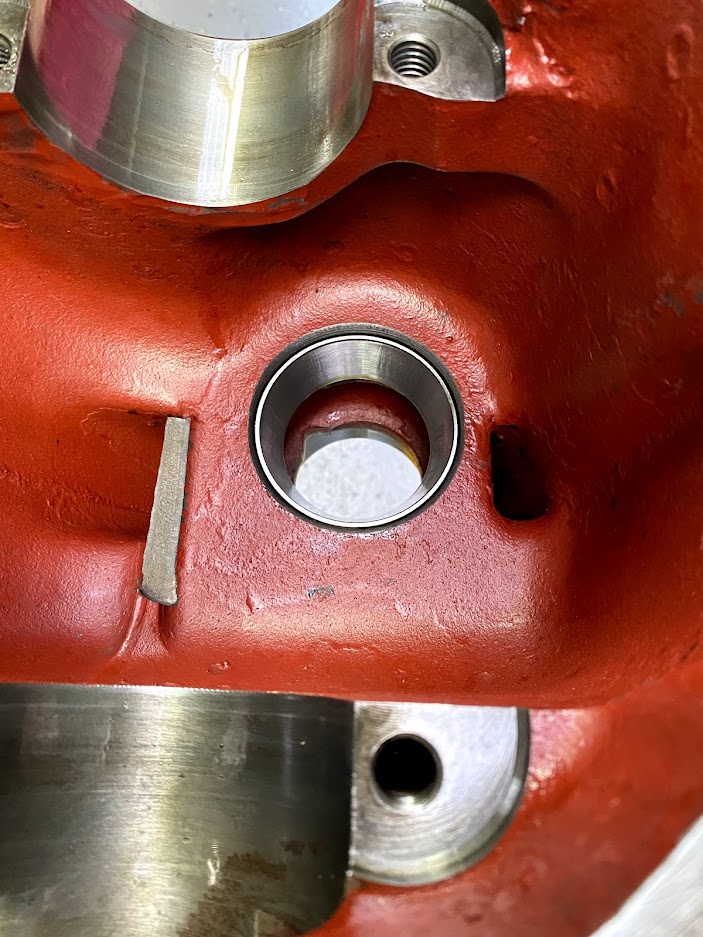
New "O" ring in position on output shaft bearing housing - only $3.00 from a bearing supplier or you can pay between $8.00 - $10.00 from a Jag spares outlet if you have plenty of money

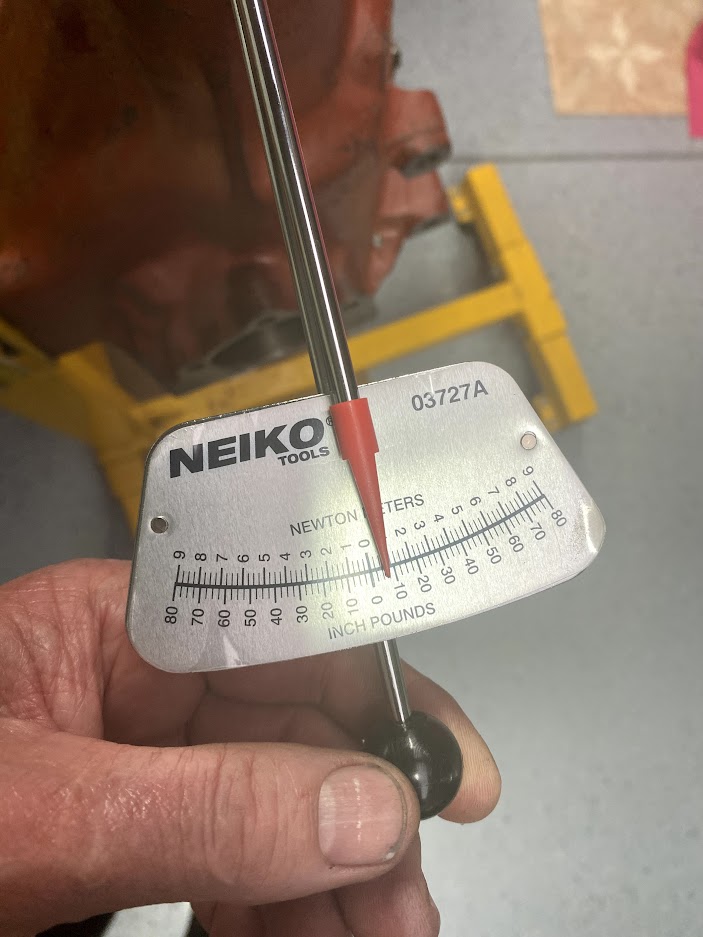
I started setting the crown and pinion backlash today which is time consuming. Fit both output shaft bearing housings by using three bolts evenly spaced per side. Set up a dial indicator against one of the crown wheel teeth in line with the direction of travel. Move the crown wheel by hand to check the backlash and tighten the output shaft bearing housing side bolts and slacken the bolts on the other side until the correct backlash is obtained. The carrier bearing bolts are left slightly loose during this process so that the carrier bearing cups move as the bearing housings press against the cups. I fit temporary shims between each bearing housing and the diff housing and retighten the carrier bearing bolts between each reading to maintain consistent readings. The backlash etched on the crown wheel is 0.007" on my diff and I am close to that figure with a measured backlash of 0.009" using temporary shims. When the backlash measures 0.007" I will measure the total shim thickness per side and subtract 0.003" from each shim pack to provide 0.003" of preload and then fit five bolts per output shaft housing and tighten up. I will finish setting the backlash in the next few days.
Backlash measuring


Temporary shims


This photo shows the output shaft bearing housing protruding through the diff case pressing against the carrier bearing cone to adjust the backlash

Most of today was spent cleaning and painting the XJ40 driveshafts, brake back plates and hubs etc. I should have them painted in the next few days and will post up the results
I started setting the crown and pinion backlash today which is time consuming. Fit both output shaft bearing housings by using three bolts evenly spaced per side. Set up a dial indicator against one of the crown wheel teeth in line with the direction of travel. Move the crown wheel by hand to check the backlash and tighten the output shaft bearing housing side bolts and slacken the bolts on the other side until the correct backlash is obtained. The carrier bearing bolts are left slightly loose during this process so that the carrier bearing cups move as the bearing housings press against the cups. I fit temporary shims between each bearing housing and the diff housing and retighten the carrier bearing bolts between each reading to maintain consistent readings. The backlash etched on the crown wheel is 0.007" on my diff and I am close to that figure with a measured backlash of 0.009" using temporary shims. When the backlash measures 0.007" I will measure the total shim thickness per side and subtract 0.003" from each shim pack to provide 0.003" of preload and then fit five bolts per output shaft housing and tighten up. I will finish setting the backlash in the next few days.
Backlash measuring
Temporary shims
This photo shows the output shaft bearing housing protruding through the diff case pressing against the carrier bearing cone to adjust the backlash
Most of today was spent cleaning and painting the XJ40 driveshafts, brake back plates and hubs etc. I should have them painted in the next few days and will post up the results
-
grahamjb
- Posts: 226
- Joined: Sun Feb 17, 2013 8:40 pm
- Location: Perth
Re: Modifying a JAG IRS from Inboard Brakes to Outboard Brak
Whilst I am rebuilding the diff centre I have also made a start on getting the other bits and pieces ready to complete the conversion.
The XJ40 hubs, drive shafts and handbrake assy's have been well used as seen in the photos.


All bits have been cleaned and painted with black polyurethane and for $50 I had new linings bonded to both sets of brake shoes

Have also started fitting new universal joints to the half shafts

The XJ40 hub and XJ6 series 1 swing arm will fit together nicely

But the XJ40 hub shaft is thinner than the XJ6 series 1 shaft by 2mm so I turned down some steel bushes on the lathe to solve the problem


The XJ40 hubs, drive shafts and handbrake assy's have been well used as seen in the photos.
All bits have been cleaned and painted with black polyurethane and for $50 I had new linings bonded to both sets of brake shoes
Have also started fitting new universal joints to the half shafts
The XJ40 hub and XJ6 series 1 swing arm will fit together nicely
But the XJ40 hub shaft is thinner than the XJ6 series 1 shaft by 2mm so I turned down some steel bushes on the lathe to solve the problem
-
grahamjb
- Posts: 226
- Joined: Sun Feb 17, 2013 8:40 pm
- Location: Perth
Re: Modifying a JAG IRS from Inboard Brakes to Outboard Brak
FYI removing the hub pivot bearing cups in the XJ40 hub is a bit tricky because you cant use a straight punch on the edge of the bearing cone due to the internal tube being narrower than the cup. You will need to make a right angle drift to engage the edge of the old bearing cup to drift them out.
Photo of installed cups and axle tube - as you can see the bearing cup is not visible on the other side

Custom Cup removal drift

Not a great photo but you can see the drift engaging with the edge of the cup ready to by hammered out

Inserting new bearing cups


The hub pivot bearing and cup is Jag number CAC4610 which consists of a Timken LM11949 bearing/LM11910 cup and a duo face seal. These are not available from any bearing suppliers in WA (& Oz according to the WA bearing suppliers) which provides limited options. You can buy the CAC4610 from a Jag parts supplier for $180 at circa $45 per bearing X 4 or buy 4 x LM11949 bearing/LM11910 cup which are cheap as chips and re -use the duo face seal on the new bearings. The duo face seal is easy to prise off the old bearing and is a good option.
Prising off Duo face Seal

Duo Face seal prised from old bearing

Cleaned up Duo Face seal

New Bearing and Old Duo face Seal installed in Hub

When replacing the XJ40 rear wheel bearings buy the wheel bearing kit from Allied Bearings as it will save you money

Home made bushes pressed into swing arm

Pressing in new needle roller bearings into inner pivot of swing arm


Photo of installed cups and axle tube - as you can see the bearing cup is not visible on the other side
Custom Cup removal drift
Not a great photo but you can see the drift engaging with the edge of the cup ready to by hammered out
Inserting new bearing cups
The hub pivot bearing and cup is Jag number CAC4610 which consists of a Timken LM11949 bearing/LM11910 cup and a duo face seal. These are not available from any bearing suppliers in WA (& Oz according to the WA bearing suppliers) which provides limited options. You can buy the CAC4610 from a Jag parts supplier for $180 at circa $45 per bearing X 4 or buy 4 x LM11949 bearing/LM11910 cup which are cheap as chips and re -use the duo face seal on the new bearings. The duo face seal is easy to prise off the old bearing and is a good option.
Prising off Duo face Seal
Duo Face seal prised from old bearing
Cleaned up Duo Face seal
New Bearing and Old Duo face Seal installed in Hub
When replacing the XJ40 rear wheel bearings buy the wheel bearing kit from Allied Bearings as it will save you money
Home made bushes pressed into swing arm
Pressing in new needle roller bearings into inner pivot of swing arm
-
FX Panelvan
- Posts: 266
- Joined: Wed Apr 09, 2014 10:44 am
- Location: S E Qld
Re: Modifying a JAG IRS from Inboard Brakes to Outboard Brak
Hi Graham
Looks a though there is a problem with the photo host.
Cannot see any of them.
The text is there but nothing else.
Looks a though there is a problem with the photo host.
Cannot see any of them.
The text is there but nothing else.
regards
Brian
Brian
-
grahamjb
- Posts: 226
- Joined: Sun Feb 17, 2013 8:40 pm
- Location: Perth
Re: Modifying a JAG IRS from Inboard Brakes to Outboard Brak
Thanks for the heads up on the missing photos Brian - I have checked with another member who has confirmed that none of the pictures I posted last night are visible to him as well.
The odd thing is that I can see all of my posts so hopefully one of the moderators may see this and offer a solution.
Cheers GB
The odd thing is that I can see all of my posts so hopefully one of the moderators may see this and offer a solution.
Cheers GB
-
46 deluxe
- Old Hand
- Posts: 3641
- Joined: Sun Aug 17, 2003 12:50 am
- Location: geelong vic
Re: Modifying a JAG IRS from Inboard Brakes to Outboard Brak
Yeah no pics here either , but it's only the last lot you posted , all the earlier ones are ok .
scott
-
FRANK BASILE

- Old Hand
- Posts: 13895
- Joined: Wed May 07, 2003 3:14 pm
Re: Modifying a JAG IRS from Inboard Brakes to Outboard Brak
Same here. "Boxed x" for photos. Thanks also for the great article and detail to the process.
OZ-E-Rodders Rod and Kustom Club Member #31